You will love this. Since 2009, I have been making money online. Here is my step-by-step guide to a money-making blog. In 6 simple steps, you can have a “goldmine” that works for you day & night (24/7). This is a tested method that has proven its value hundreds of times… Find out the best way to start a blog in 15 minutes.
WordPress is a platform that makes creating and managing websites easy. Platforms that do not require you to write code are called content management systems (CMS). WordPress is a CMS released in 2003 for the first time.
Initially, it was mainly used for blogs, but nowadays, you can make any website with WordPress. Think of it for a second. All the e-commerce websites, forums, online catalogs, auctions, subscription websites, and marketplaces can run on WordPress.
Next to WordPress, there are other alternatives you can use to build and manage your website. (Frankly speaking, other solutions don’t come even close.)
After 19 years of battle-tested features, WordPress has become the #1 platform for building websites (including blogs).
Not persuaded that WordPress is for you?
How about this?
Out of 1.8 billion websites worldwide, around 800 million websites are powered by WordPress.
Let’s put that into perspective.
Out of 1.8 billion websites worldwide, 800 million are created with WordPress.
So, WordPress is a good choice for me (and 800 million other website owners). (My blog runs on WordPress as well.)
First off, it’s a free solution (you do not pay a thing for the platform itself). Everyone can download and use it (for private and commercial purposes).
You heard it right, even when your WordPress blog starts making money, you do not have to pay for any licenses. It’s all yours.
WORDPRESS IS AN OPEN-SOURCE PLATFORM.
In other words, the code is publicly available, and anyone can contribute to improving the next version of WordPress. (Many people create WordPress extensions — plugins; we will discuss this shortly).
This joint effort and the full transparency of WordPress have made the platform the global #1.
WordPress community releases plugins that are also free of charge (most of them) that you can use to enrich the features of your website (blog).
Overall, the community supports WordPress exceptionally well, and you can have many features FREE of charge. (Not to mention the available knowledge base after 19 years of presence.)
This is why WordPress is the best choice for starting a website/blog — equally suitable for beginners and advanced users as it does not require coding.
Questions?
Should I start a blog?
If you have a subject you know about just a little more than an average person, it makes sense to start a blog about that topic. You would be amazed to know how much you can teach others even with little knowledge. All that while making money.
How much does it cost?
WordPress is free of charge. You only pay $3 – $7monthly to host the website (more on this later). So, costs like one medium-sized Starbucks Americano.
How much time do I need to set it up?
The installation itself is a very quick process (a matter of minutes). The rest is styling and depends on your preferences.
Is having a blog still profitable in 2023?
Definitely. People love reading about how to do things more than ever. Serious money is made on blogs every day.
What to do if I am a total beginner (with no coding experience)?
Beginners are welcome. WordPress does not require any coding experience. Still, if you are a technical person, you can write code for WordPress yourself — it’s equally good for everyone.
What qualifies me to write about WordPress?
Let me tell you why this post is worth every second of your time…
O.K.
Now I have to brag a little.
I don’t mind… Because I want to prove that you are reading the most informative post on the subject.
There are tens of other blogs where you can also read about WordPress… But not every post is the same…
Why?
Because the authors have different knowledge & experience — only a few can pass on to you the best-in-class learning material.
It’s reasonable to choose authors who “have been there & done that” so you can get an excellent head start.
If you read about my career here, you will see that I have been present in the tech industry since the beginning of the modern internet (2007 onwards).
Since then, I created hundreds of WordPress websites for my customers. (I probably touched thousands of websites for minor fixes, maintenance, and plugin adjustments over the last 15 years.)
Think of it… More than a thousand people (businesses) gave me their trust (and WordPress admin credentials). (For many, their website is the main source of income.)
And, of course, they would pay for it… When someone pays for your service — they trust that you know what you are doing…
What did more than 700 people say after the fact?
Well, there are 783 5-star reviews on my WordPress services (see the below snapshot from Fiverr.com).
In addition, I have funded several WordPress blogs for myself (the most popular one welcomed more than 12 million users to this day). (Of course, I now have teams working on it, and it is no longer a single-person effort.)
In short, when it comes to WordPress, I know what I am talking about because I have done it so many times…
Thanks to this, I have been making a living online for over 15 years. Traveling the places and working from wherever I want (and at the time that suits me the best).
In short, I am living my dream based on my knowledge of WordPress (and other marketing & tech topics).
By the end of the post, I can pass the same knowledge to you (plus some tips you cannot find elsewhere)…
…So that you can live your dreams as well…
Read on to learn how to make money with WordPress. (Like many of us do.)
You want to have your blog. What’s the next important step?
You must select a topic that you are going to write about. It is extremely useful if you already have an interest in certain subjects.
Remember, you do not need to “know it all” to start your WordPress blog. It is sufficient that you have an interest in the subject and want to keep learning.
Let me tell you a true story…
Enemies imprisoned a soldier in a war. This soldier had a pocket English dictionary with him. As the guards showed interest in learning a few new words, the imprisoned soldier would teach the guards three new words daily. The guards were postponing the execution of the soldier because he taught them a new skill.
Day after day, this lasted until liberation, and the soldier survived the war (unlike many of his comrades)… Only to confess later that he would learn those three new words the same day and only a few hours before his students (guards). (The soldier was also a total beginner.)
So, in this step, you choose your blog niche (market). (Niche is a category that you want to specialize in.)
Do not spend that much time thinking because too much choice leads to “paralysis from analysis.”
Once you choose, stick to it. Here is the list of the most profitable niche markets in 2023.
HINT: Pick a narrowly-focused niche rather than a general one. For instance, “food for diabetics” would be a solid niche. However, the “paleo diet for diabetics” niche is better. “Paleo diet for pregnant women” is the best.
While moving from a too-general subject to the narrowly focused (sub-niche) topics, you also avoid the competition (have more of the market to yourself).
Niche: Food
In the last 20 years, we have become much more aware of what we eat. Simply speaking, what you eat is what you are. This gave rise to a multi-billion online empire around food. And it is not going to stop there…
Do you follow a certain diet (keto, paleo)? Maybe you know about the proper diet for diabetics, for instance (from someone in your family).
Or for losing/gaining weight. If you know more about this than an average person (and if you are interested in the subject), the earning possibilities in this niche are enormous.
If you are an athlete with attractive muscles, you can also write about recipes/habits that people can follow to look exactly like you.
Possibilities are extraordinary (again, pick one and stick to it).
There are recipe blogs out there that make more than $100,000 a month. Example is https://pinchofyum.com
This is a big one… We do a lot of things so that we are more likable. You do not have to own an international cloth brand to start in this industry.
It is okay if you start small. Women are slightly more leaning toward beauty & fashion than men.
Perhaps you can start writing about makeup tips & tricks. Or what’s the best skin treatment for women under 30? Or the best skin care during the summer months? Remember to pick the narrow niche…
This niche is highly profitable because you can start your own line of clothes/makeup/perfumes as your blog advances.
Some time down the road, you can charge extremely high prices for your products as more and more people become interested.
See, for example, https://theblondesalad.com/. This blog reports earnings of $30 million a year. Incredible.
All of this you can do with a WordPress website (+ much more)…
Niche: Making & Saving Money
I bet there is a guru in your neighborhood teaching others how to make money…
Joking a bit. Still, this is a vast market. Even though it has become a bit overcrowded with gurus for this and that, there is always room for quality content.
Have you had a significant financial success? Fliped a second-hand car and earned a few hundred dollars? Renovated an apartment and sold it for double the amount? Found a new way how to make money online?
You can write about that and let people follow your advice. Money & wealth is one of the biggest motivators out there.
Show people precisely what to do to make money, and you will have a bunch of readers.
It is equally relevant if you know how to save money (hacks, tips & tricks). Show them any of these, and the sky is the limit.
For example, https://www.makingsenseofcents.com reports $100k a month…
You are different than anyone else. Are you enjoying sharing what you do every day?
Do you find it attractive that others approve and comment on your daily habits?
Instagram is full of influencers (and some are making a lot of money).
Why not turn this into a WordPress blog about your lifestyle that others can copy and benefit from?
The main problem with Instagram, TikTok, and Facebook is that your followers are not really yours… You do not have their contact — Instagram has.
Once Instagram changes its policy, it might just ban your account, and you lose everything in the blink of an eye. Years of work went down the drain… Nowadays, big social networks ban accounts for nothing…
With a blog, you are fully protected.
Your audience and readers are yours forever, and nothing is lost. You get full control.
Blogs such as https://www.cosmopolitan.com report $650,000 a year.
Niche: Consultancy
There are many people out there who have a professional career but never get time to write about it.
Think of lawyers, doctors, opticians, nurses, teachers, construction engineers, professional programmers, gamers, or managers/business consultants…
All these people are so busy with their day-to-day that they oversee an immense opportunity.
You can easily turn that into a blog if you specialize in a similar occupation.
(Writing about something you do daily is much easier than you think.)
After some time, your readers will develop trust, and you will start receiving consultancy requests (top consultants, regardless of the industry, charge up to $1000 hourly).
Once the ball gets rolling, the opportunities show up out of nowhere. That is why it is crucial to start today.
For instance, https://www.melyssagriffin.com/ reports $283k a month. Insane but completely possible.
Niche: Pets
People are becoming more and more lonely. That’s a fact.
Pets are there because we feel more “loved” or combat the fear of “being alone” easier.
Psychology aside, people are spending big time on their pets. Simply speaking, pets provide unconditional love (that we are all after).
Be it a cat, a dog, or a frog (yes, there are extreme pet categories).
If you have a pet yourself, you already know many things that, for instance, I do not know (since I do not own a dog). So, that is one potential reader…
Remember the soldier story? You only need to know a bit more than the average person to prosper in this business (and make money).
Why not start a blog about American Staford + Australian Bulldog blend (or a similar breed you own)?
How about a blog about “Siberian Husky hair care” only? Pick the right sub-niche, and you have the market to yourself.
Pet-based blogs are earning more than ever. Notice https://youdidwhatwithyourweiner.com reports $7,500 a month.
Even though kids can be a crucial factor in many people’s lives, kids still cause a lot of trouble.
For instance, new parents have no idea about milk temperature or how often to bathe their newborn boy.
In the teenage years, parents get discipline problems with their kids.
The possibilities are enormous. Parents would give everything for the well-being of their kids.
This only means one — the market is hungry (and you are invited to tell what you know about the topic).
Do you know of a method that can effectively discipline a teenage girl? Or perhaps how to teach kids to read under the age of 5?
Some blogs like https://twinsmommy.com make $30,000 a month.
Niche: Travel
Have you seen places, and do you like traveling? There are millions of people traveling every day that are seeking guidance.
A good blog that specializes in giving guidance to travelers can do wonders.
For instance, many Europeans are living in Tanzania. Why not start a blog about living in Tanzania (what’s needed, how to get a visa, what are good neighborhoods)?
If you are like most people, weeks before your holiday, you already have a list of the important places to see at your destination (things to do in _____ ).
Guess what? The blog owners are making money on it… And you can be one of them. Ever reserved a tour online?
One travel blog example is https://www.twowanderingsoles.com, which reports $25,000 a month.
Niche: Fitness
Many of us dream of having a nice body. Some want to lose weight, while others want to gain and have a muscular body.
This is insanity for some who have been struggling for a long time with their problems…
Do you think that they would read your blog if you could help them solve the problem?
I think you know the answer…
It is easy to oversee what is obvious… You might be exercising every other day, BUT others are actually struggling.
It’s just a normal lifestyle for you and takes almost no effort.
Others would kill to develop the same habit of exercising regularly.
There is a hungry market out there — can you help?
See here, https://www.kathkyle.com reports $15,000 a month. Not bad at all…
Niche: DIY
DIY stands for “do it yourself.” More and more people (myself included) want to know how they can do simple fixes themselves.
Change a bulb on your car? Paint the wall or put wallpaper?
Hiring a bathroom-tile expert in Europe is slightly cheaper than hiring a lawyer.
You can imagine how much people can save if they learn to do these things themselves.
Home & gardens are just one example; there are numerous other possibilities.
This DIY website — https://jennifermaker.com — reports $15,000 a month.
The hottest niche markets for your WordPress blog in 2023
Questions?
What if I cannot decide?
That’s understandable. Think again. At least you must have some minimal interest in one of the niche markets. Just pick that one and forget everything else. Perhaps have two alternatives you equally like? Just flip a coin, and follow the one that gets picked for you. It does not matter, just do not spend too long in the stuck state — 99% of people do nothing because of this.
Are you good at something that is not on the list?
That’s fine. Do you see other businesses around this topic? If yes, the niche is still profitable. The idea is to pick a niche where there is a high demand.
Can I make that much money in the first month?
Most likely not (there are exceptions). You will need a few months before you start making money.
Is this a full-time job?
Nothing like a 9-5 job. You will do it on your terms when you have time (see it as a flexible part-time job). Many people start it as a hobby, and when it becomes a business, they quit their regular jobs…
Do I have to be an expert on the subject?
No. Of course, the more you know, the better. To start, you only need to know slightly more than an average person (or be interested in learning).
Do I need to know what I am going to write exactly?
No. At this point, it is enough to pick a niche market that you have an interest in. The rest will come later in the post. So, select one of the ten categories above, and you are already good.
Does it require talent or luck?
No. It’s a blueprint that you follow. No talent is required. All you need is some brain power to follow the simple steps from this post.
Do you want your blog to stand out from the crowd? Give it a good name.
Here is how to do it…
On the Internet, every website has an address. We call this the domain name.
The domain name has two main parts: your blog name (you choose) + the domain extension (selection between .COM, .INFO, .NET, or many others).
Think now about the perfect domain name for your blog. This will be your “business name.”
Based on around 50 domain names I own(ed) for my projects, here are some tips to help you.
Target the .COM domain (it’s a premium domain name, and there is a limited number of these available); unless you are operating locally where the local domain name is more appropriate (such as mydomain.NL or mydomain.CO.UK)
Make the domain name short & easy to remember (maximum 12 characters without the domain extension — e.g. . COM)
Do not use any special characters — my-domain.com is worse than mydomain.com (people remember words but cannot remember the position of the hyphen symbol easily)
Ask others to read the domain for you — do they read it fluently, or is it hard to pronounce?
In some words, the letter C can sound like the letter K — be aware of this because you also want World of Mouth to promote your website in the spoken language (e.g., elitico.com can sound similar to elitiko.com)
Do not add digits unless completely necessary (e.g. mydomain123.com)
Later down the road, consider buying more domains (e.g., mydomain.COM, mydomain.INFO, mydomain.NET) — this is good to avoid competition copying you once the website becomes more global
Optional: Make sure that your blog name does not mean anything offensive in other primary languages (e.g., English, Spanish, French, German, or Russian). This becomes more important for more globally-oriented websites.
Here is the most important TIP: The sooner you register the domain, the more money you get from it. Let me explain…
See the domain name as an asset. The domains appreciate in value in the same way a property does. For instance, this blog’s domain name is estimated at $970 (while I paid only $21 when I bought it).
As more time passes, the higher value it gets… (At any moment, you can sell the domain name via an online auction.)
Write down what you choose so that you can have it ready for the next step, where I will show you how to register the domain.
NOTE: If you cannot decide about the final domain name (or if it is unavailable), you can do this step later. It is not blocking you from reading further.
P.S. Again, do not spend too much time on this step… Take Apple as an example. When the company was founded, the name came up as a joke initially… Frankly speaking, it does not even sound interesting… Apple is today the best-in-class tech giant. This proves that what comes after is what distinguishes and creates value. Believe it or not, the name itself is not of major importance. Choose the best you can and move on (or decide later).
Blog name generator for best name ideas
Type a keyword to get blog name ideas that you can use directly.
How to select the right WordPress hosting (that won’t disappoint you)?
This is important. Now you have to bring your blog online so the world can see it.
How do you do that? You need a web hosting solution…
What is hosting?
It is a place where you store your WordPress blog. Specifically, it is a server (computer) that can be accessed globally (with WordPress installed on it). Hosting companies ensure the server is lighting fast & optimized to serve your WordPress blog traffic 24/7. You can then access your blog via a URL (web address) by typing it into a web browser (e.g., https://igorjovanovic.com).
How much does it cost?
BlueHost offers reliable hosting packages that cost less than $3 a month. Depending on how secure you want your blog to be, it can go up to $7 a month.
What is the best web hosting?
I have tried many different hostings for my own projects and for my customers. The best value for money is offered by BlueHost. It’s relatively cheap, secure, and yet very reliable (+ they offer great support). 9/10 times I use this hosting as it proved its value multiple times over the years. (that 1 out of 10 is when I am building large-scale mobile apps that use different hosting solutions.)
Are there free alternatives?
Yes, you can host a free blog at WordPress.Com. Since it is free, there are very strict limitations. Some restrictions: you CAN’T install plugins, you CAN’T customize the theme fully, you CAN’T add ads to your blog (to earn money), you CAN’T add shop functionalities (there is more)… So, the blog is not truly yours… I do not recommend the free alternative if you are serious about starting a blog. Simply because the free alternatives are not truly free — when your blog starts growing you will pay dearly for additional features/storage (upgrade can cost up to $500 per year). This post is focused on a self-hosted WordPress blog (where you are behind the driving wheel and have 100% control).
The web hosting I personally use is Bluehost. Over the years, I created hundreds of WordPress websites with Bluehost (a sort of a battle-tested solution for me).
Bluehost is also one of the most established & largest companies in the hosting industry — founded in 2003.
If you choose something else, remember that your web hosting must be secure enough (against attackers). Also, make no compromise with the blog speed and availability (no use of web hosting with frequent service failures).
Since Bluehost completes all the checkboxes (while being officially recognized by WordPress), I will show you how to open an account there.
Notice: Since I am based in Europe, my snapshots might be slightly different than what you see — e.g., the prices are expressed in Euros (€) here, and you will see Dollars ($), of course.
What is the best hosting plan for you?
I recommend selecting the officially recommended plan called “Choice Plus.”
With this plan, you do not have to worry about additional memory and migration to a different plan as your blog grows. There is enough storage even if you want to add many high-definition media to your blog posts.
That’s not all — you get the full protection of your private data — your name, email, and home address will not be available online (not every host company offers this protection).
The reality is any plan will do. The “Choice Plus” package is my preference. If the price concerns you, select the “Plus” or the “Basic” plan to feel more comfortable.
Choose the domain name for your blog
Now select the domain name that others will use to access your blog. (I recommend selecting a .COM domain, but it is fine if you use any other extension, e.g., .INFO or similar.)
If unsure, you can always click “I’ll create my domain name later” at the bottom of the screen. (Your free domain by Bluehost will be waiting for you — so you are not losing anything.)
To skip the domain name step for now, click on the text similar to this (at the bottom of the page):
Register an account (almost done!)
Fill in your personal details (pretty much a standard sign-up form as everywhere else).
Now you have to choose a term for the selected plan. This basically means how much in advance you want to pay for the hosting service.
Most hosting companies, Bluehost included, do not offer monthly payments. The industry standard is to pay for one or more years in advance.
Depending on your location, you will have 1,2,3 or 5 years as an option. (More years you pay in advance, the bigger the discount.)
I personally always take the 3-year option for my clients since this leaves enough time for the blog to mature and develop (and does not put any pressure).
Also, the savings are considerable, and you lock the price for years to come (especially important when prices are increasing globally).
You may choose the term that suits you the best. (Note the term options can be named differently, depending on your location.)
In the package extras section, you may select some additional options. At this point, you can uncheck everything. Eventually, you may leave the “SiteLock Security” option on, but you do not have to — Bluehost is secure enough even without that.
(Saving is always good when not compromising security or other critical factors…)
The total shows what you pay for the service (for the entire period you selected). (No more costs since everything else is free of charge.)
NOTE: Bluehost offers a 30-day no-ask money-back policy. If anything unplanned happens, you can always get your money back — zero risk.
The last step before the world can see your blog… Fill in the billing details, check the “Terms of Service” checkbox, and click the green “Submit” button, as shown below.
Congratulations!
It’s a historical moment for you. Once your blog grows into a full-scale business, you will celebrate today’s date as an anniversary.
(I do celebrate the date when I purchased my blog domain name — but the .INFO version — igorjovanovic.info — since it was the first domain I owned).
Take a moment to celebrate (with a glass of your favorite drink) and then go to the next section (for some more good things…).
Here is the video of the exact steps to create an account at Bluehost.
How to get started with Bluehost & WordPress in 2 minutes
Disclosure: When you register an account with Bluehost through the links in the post, my website can earn a commission. This keeps the guide free of charge and open to everyone (yet, writing good content takes a lot of time). Rest assured that I only recommend what I personally use & what was battle-tested with many hundreds of my customers & my private projects (proven solution).
Only a few more clicks and your blog will see the daylight for the first time.
(If you prefer to watch videos, here is the video that shows how to finalize the configuration. If you prefer to read, follow the text further — the result is the same.)
Configure WordPress in Bluehost
Once you complete the payment, this is the page you will see (at the bottom, there is also a payment receipt in case you need it).
Go ahead and confirm your email first — open your mailbox and click the link from the email Bluehost sent you. That’s it; your account is fully activated now.
The screen you will land on (after confirming the email) looks similar to this.
You do not have to do anything in that tab but keep it open (we will use it later).
Navigate to the tab with the welcome message from Bluehost (that has the green “Create your password” button).
Click the green “Create your password” button to create your Bluehost password (you will use this password + your email to log in to the Bluehost account or to request support).
After you have set up the password, return to the tab that asks you to “Pick a theme” and scroll down to the bottom of that page. There, you hit the “Skip This Step” button, as shown below.
Bluehost will now install WordPress for you… Relax for a few moments until your blog is ready (it takes 1-2 minutes at most).
Once everything is done, here is the screen you will see.
If you have selected the domain name while setting up the account, you will see a notification at the top of the page.
This basically means that Bluehost will give you a temporary domain so that you can get started immediately. (You will notice a strange URL address once you reach the WordPress Admin panel).
So, the domain name will not be the same as the one you selected. Nothing to worry about — once your selected domain gets ready, Bluehost will automatically connect it to your WordPress website.
This usually lasts up to a few hours. You can normally use your WordPress blog in the meanwhile and continue with the customizations.
Click the blue “Start Building” button to see the magic.
Welcome to your WordPress Admin Panel
The page you see now is your WordPress Admin panel. Only you can access this page, and you will manage the entire blog from here (never share this page with anyone and keep it top secret).
What is an admin in general?
Admin stands for an administrator. It is the most powerful user that can access any part of the system. There are no limitations to this account, and it should be used cautiously (and never shared with others). Why? Because the account has the power to destroy everything. (WordPress is no exception.)
What is WordPress Admin panel?
Your blog has two sides — one for your visitors (public) and the other for you (the administrator) which is private. From the admin panel, you (the administrator) edit the website and add posts. Actually, much more than that (you will learn more about it in the next steps). Admin Panel is only for your eyes and no one else can access it.
A few last steps to finalize the configuration… Select either “Personal” or “Business” to go to the next page (I usually always select “Personal” — it makes no difference).
Now you have to fill in your blog title and the description. Keep it short and to the point (mine is IgorJovanovic.Com [title] — IT professional with 15+ years of experience [description]).
You can change both at any point. Hit “Next Step.”
On the next page, WordPress is getting ready to finalize the configuration. Click the blue “Yes” button to respond positively to the question (since you will indeed write posts and update the blog).
Next, select the left-hand-side box to list your latest posts (news/updates) on the home page, as shown below.
Now click “Yes” to automatically allow WordPress to create a contact page.
On the next screen, click “Not Now” to skip the step with Jetpack setup since you do not need it right now.
That’s it — you are all set. Click the right-hand-side x button, as shown here, to finalize the setup.
How to log in to Bluehost and WordPress Admin?
There are two easy ways to access your WordPress website.
The first is through Bluehost. To log in, follow this link and enter the email and password (you created this password a few steps back, remember?).
Once inside, in the Home section of Bluehost, you will see “Log into WordPress” as below. Click that button to log in to your WordPress blog.
Alternatively, you can go directly to your domain name and add /wp-admin at the end of the address. For example, here is the admin panel address for yourdomain.com.
https://yourdomain.com/wp-admin
(Make sure you replace yourdomain.com with your actual domain name.)
This will lead you to the login page. Enter your email and password to log in. Look below.
Your blog is now officially set up and ready. Next, we will optimize WordPress to look “prettier” and work much faster.
Right now, the blog looks interesting as an electricity or telephone bill (because it’s empty)… But do not worry; the most tiring part is already behind.
At first, the WordPress Admin panel might look like an airplane cockpit… There are 100 different buttons you can press, and too much choice can be overwhelming…
In reality, it’s easier than you think (90% of buttons you won’t touch ever).
What you have to make sure is that you understand the core WordPress terms.
Let me explain some…
What is a page?
You use Page in WordPress to create static content (content that does not change frequently). Ever seen the About or Contact page in a menu? These are typical examples… The pages you create will also have their public address (URL). My contact page is here: https://igorjovanovic.com/contact/ To create a new page, go to WordPress Admin –> Pages -> Add New.
What is the Home Page?
This is the main page of your website. Whenever someone visits your domain name, they see the home page of your Blog (usually shows the recent posts).
What is a post?
It’s very similar to your social media… A post is an update about a certain topic. WordPress posts are typically longer than your social media updates. On most blogs, the posts appear on the home page in chronological order. To create a new post, go to WordPress Admin –> Posts -> Add New. You classify your posts into categories.
What is Category?
It’s a section of your blog that stores posts that belong to the subject (kind of a grouping mechanism – similar to folders on your desktop). To create a new category, go to WordPress Admin –> Posts -> Categories -> Add New Category.
Where can I see the comments?
By default, WordPress lets others comment on your published posts. If you scroll down to the bottom, you will see the comment section. All the comments that your visitors write appear exactly there. One catch: you must approve the comments by going to WordPress Admin –> Posts -> Comments.
Now that you know the basics (and even more) let me show you something else…
P.S. Ask questions in the comment section for additional explanations…
The core WordPress functionality is straightforward. The homepage shows the most recent entries summaries & every post entry can be extended to show the full text.
Remember that WordPress is Earth’s #1 blogging platform? How come something this simple can be so popular?
That catch is: you can extend and improve the default WordPress functionalities by using WordPress plugins.
What is a plugin?
It’s an extension that adds a particular feature to your WordPress blog. Think of the share buttons, image galleries, newsletter popups, booking calendars, or really anything else that is not the default behavior.
How much does this cost?
Most plugins are free of charge. Right now, WordPress offers 60,376 free plugins that you can install and use. In 99% of the cases, you can find a free plugin for any feature that your blog requires.
Who creates these plugins?
WordPress is so powerful because of its immense community. Everyone can write a plugin and list it in the WordPress plugins directory (after WordPress approves it). So, there is an army of WordPress developers writing plugins (some do it for business and some do it on a non-profit basis).
Are there premium plugins?
Even though most of the plugins are free of charge, there are some that also have a premium version. This is a more advanced version that adds even more features to your WordPress website. In most cases, you can do everything with free plugins.
Can I write my own plugin?
Writing a plugin requires some programming knowledge. Namely, JavaScript, PHP (+HTML, CSS). It is absolutely not a requirement but if you want more challenges you can give it a try.
(Familiar with Google Play Store or App Store on your mobile? WordPress plugins gallery (directory) is very similar. You browse and select the features you wish to add to your blog.)
You manage (add/remove/enable/disable) plugins directly from your WordPress Admin Dashboard –> Plugins.
This is what the page looks like
You can access the plugins page by going to the below address (replace yourdomain.com with your actual domain name).
You want to optimize your website for speed. The more plugins you add, the more code “runs” behind WordPress… This results in a slower website overall and causes long waiting times for the posts to load.
I bet you exit any website that takes more than a few seconds to load (I do the same)…
Why? Because we got used to getting the results right now.
And Google (and other search engines) know that… That’s why the fastest blogs are favored the most (and on the first page of Google).
To those blogs, Google is sending avalanches of traffic every second. And to the slow ones — none, graveyard.
(More traffic means more earnings.)
With my clients, I have seen tens of WordPress websites that were literally devastated by too many plugins (one blog I worked on had 47 plugins installed). Oh boy…
Makes sense? Great. Let me show you now how to do it the right way.
WP Super Cache | How-To Video – Stores your posts & pages in a “zipped” format. Compresses all the media/images so that your blog loads lightning-fast.
Simple Custom CSS and JS | How-To Video – Makes integration with other providers possible (for instance, the newsletter and analytics providers).
Grow Social | How-To Video – Makes your blog posts easily “sharable” by adding share buttons. Crucial in getting traffic from social networks.
Contact Form 7 | How-To Video – Plugin that creates a contact page. You need it so that others can send you business proposals and questions via email.
a3 Lazy Load | How-To Video – Makes images load seamlessly so that the page speed is not impacted (makes posts with images lighter & load faster).
Notice: every plugin in the list has a How-To Video. If you click on the How-To Video link (next to the plugin name), you can watch the video on installing and configuring each plugin.
Finding the right WordPress theme
Let me tell you this.
Your blog is almost finished & you will start writing soon.
The last “technical” thing to do is select your blog’s appearance. It’s a sort of “clothes/dressing” of your WordPress blog.
What is a theme?
It’s a pre-built design that you can use to style your blog.
How much does it cost?
Most of the themes are free of charge and can be used directly. There are also premium themes that cost around $25 – $45.
Can I change the theme whenever I want?
You are free to change the theme whenever you want. WordPress comes with the default theme, so you may use that one for some time (if you like it).
Does that mean my blog will not be unique?
The likelihood that you (or your visitors) will encounter another website with the same theme as yours is very low (given that there are 800 million WordPress blogs). Your blog becomes unique based on its content rather than the theme itself.
What if I want a unique logo?
That’s a fair ask. Most of the themes come with a prebuilt logo. I advise that you do not use the default logo but design your own. The logo is the main part of establishing the blog’s identity and serves as a quality warranty. You want others to recognize it miles away. If you need the designer’s services, contact me here for help.
But wait a moment… Is this blog not using the default WordPress theme that looks a bit “Yuck”..?
Well, that’s right… My blog uses the default free WordPress theme called “Twenty Twenty,” but that does not stop people from reading it… In fact, they are coming in crowds.
So, do not spend too much time picking the theme… (Right now, there are 10,787 free WordPress themes to choose from.)
What you are really after is excellent content others will want to read (more on it shortly). Then, what your blog looks like is much less important… And you can move faster…
While picking the theme, Pay attention to how fast your website loads. (It makes me sick when I see a wonderful theme that takes ages to load — Google also hates it.)
(More on how to measure & monitor the loading speed will come.)
Keep in mind that many free themes can look ugly at first sight (and on the second).
This is because the previews usually do not contain any content (just some skeleton demo texts). Once you install the theme and add the “real” content, everything will be different…
Premium WordPress Themes
If you really really dislike the free themes, this should help you…
Here are 7 premium WordPress themes that I recommend. (All of them are very fast but also very attractive.)
The only catch is that you must pay for these. (Most premium themes contain numerous features, so allow yourself more time on this task.)
Remember, too much choice is sometimes equally bad as no choice. It’s enough if you like a theme, even just a sort of… Pick one and move on.
How to install and configure your theme in 5 minutes
Now it’s time for some magic.
Let’s style your WordPress theme until it shines.
Here is a How-To video to quickly install the selected theme.
(I used the free Inspiro theme, but the video is equally relevant for any other theme.)
In short, you install a theme by going to Appearance -> Themes -> Add New.
If you are after a free theme, you can browse the directory by typing the theme name in the search box. After finding the theme, click Activate and then Install.
If you bought a premium one, you can upload the theme to your blog by going to Appearance -> Themes -> Add New -> Upload Theme.
Did you install and activate the theme?
Great, now go to Appearance -> Customize and play around until your blog looks exactly as you want. Start with the Site Identity section to add your logo.
Just one catch here…
The premium themes can be complex. The website where you bought the theme will send you a download link via email. This contains a ZIP package with your theme (on some marketplaces, you download the theme ZIP package directly from the download section of their website).
This package contains the theme and the documentation on how to install/operate it.
Premium themes: This is how the package and its content usually look like
It is crucial to review the documentation first to understand how your theme works.
That’s it; you are all set now.
Get ready. The historical moment is coming…
You will write your first post very soon (and learn all the secrets of doing it well).
Now that you have the plugins and the theme in order, there is one crucial thing to pay attention to…
Your blog must work as a well-oiled Swiss watch.
It does not matter if you have the most beautiful blog on earth if no one can see it.
What do I want to say?
To appear in Google searches, your blog must load extremely fast.
Let’s say that the top 3 Google results are all well-written posts on a particular topic. Other things being equal, what do you think who will win the 1st, 2nd, and 3rd place in Google search results?
The fastest blogs get to the top three results. And what if I tell you this…
60% of people click on one of the first three Google search results. (The rest 40% gets spread out between millions of other results.)
Recently I talked to a friend who is a co-owner of a large company that optimizes websites for Google search results. (These guys are crazy — they follow the latest ranking algorithms to a level of detail you cannot imagine.)
When I asked about the most crucial factor to rank well in search results… The answer was short: the speed (apart from the quality of content).
Does the combination of your theme + the plugins work sufficiently fast?
Here is how to test it.
Blow out the competition
Speed report for igorjovanovic.com/how-to-start-wordpress-blog
There is an easy way to test if you have done well so far…
It is mostly because of the heavy snapshots. I was too lazy to edit each, so it consumes much less space. As I said, B is also an excellent score — it’s actually lazy’s person A.
Can I improve my score overtime?
Nothing is carved in the stone. You can move along even if you don’t have an A or B score. Just keep in mind this as your ultimate goal. As long as you work on it continuously, you will get there. Start by asking questions here, and I can help.
What contributes the most to my speed score?
Web hosting plays a crucial role. Next to that, the set of plugins and the theme you installed. You should be good if you followed along and selected Bluehost as your hosting.
I have done everything, but my score is still bad?
You need a second pair of eyes. Ask for help in the comments. Are you coming from another host? Perhaps you need to migrate to Bluehost. Ask for help in the comments.
Here you are going to “do the real thing”… In a minute, you will start writing your first content.
Before that, here is the Holy Grail of all successful bloggers… (And this actually distinguishes blogs that make millions from mediocre ones.)
Here is the phrase:
This is more relevant than ever (even though it sounds like a cliche).
If you do this step right and produce fantastic content, you can get away with not completing other steps “by the book”.
Why? Because people will want to read your posts again and again…
Not on the first Google page? No problem. Don’t have an astronomic marketing budget? All good.
Great content makes people find ways to get to it… Most will even remember the blog name or bookmark it for fast access. Others will hear from their friends…
Why? Because they need it… Because your blog post solves some problems that bother them.
Everyone (including myself) will leave no stone unturned to see some of the burning problems gone.
Let me show you how to write content others will love. Read on.
Who reads your posts (and why)?
You are probably expecting some eye-opening statement here… But no, what I have to tell you is very simple & yet very crucial.
So listen carefully…
It’s difficult to write without knowing who you are talking to. Who are the people behind the screen reading those words?
Although you do not have to know them by name, there are things you must know if you want a successful blog.
People who read your posts are people with specific wants & needs (and secretly dying to meet them).
So, your only job here is to bring them one step closer to what they want…
Think of it for a moment… What would make someone stare at the screen for 20 minutes and read the entire post (this long)?
One thing will undoubtedly do — the promise that they will get what they want or get rid of what they do not want.
There are universal motivators out there. These work with every human being (including your blog readers, yourself, and me).
Notice here that these wants are very often hiding in the background… We can even be unaware of their existence (or do not want to confess).
For instance, this post can attract an audience that wants to start a blog. But what’s the driving force behind it? What want does this post address?
Most probably, to be wealthier, have fun & more spare time.
Let me give you one more example…
Why do people buy the latest iPhone when the current model is usually almost as good as the latest? Well, the latest model directly addresses the need for being popular & recognized.
And it’s no different with posts…
Your readers will have the patience to read through as long as you get them closer to where they want to be (or farther from what they want to escape).
Remember, your post will be just a vehicle your readers use to meet their desires (or address their fears).
Keep this with you whenever you sit to write. Ask yourself, “Is this post addressing some of my readers’ core needs/fears”?
If you do so, your readers will keep coming back for more.
(More tips to come; read on.)
The right mindset for writing
It’s time to dip your toes into the world of blogging.
Before I show you all the technicalities of writing a post, I want to share something essential with you…
As you start writing, an internal voice will criticize everything you write.
Your mind will be saying things like “It’s not good enough”, or “This is rubbish”, or “Who will read this”…
My advice? Acknowledge the voice but give it zero meaning.
It’s simply not true; do not engage in any afterthought or mind commentary to defend against those thoughts.
Keep writing even if the text really sucks. This is how you build a habit and practice the skill (you will edit it later — no worries).
After all, writing is nothing more than a skill that everyone can learn (and does not depend on education or IQ or anything).
In fact, the more educated you are, the more blockers you will have to write (your mind will be very harsh in criticizing every line).
So, allow yourself to wander and find your own style. Explore and make mistakes… There is no single correct way of doing things here.
The most important is to keep writing and don’t let the inner perfectionist stand in the way.
Ready? Let’s start writing now.
How To write posts in WordPress (like a Pro)
It’s easier than you think. After a few clicks, you will be ready to start typing.
Go to your WordPress Admin panel and log in. (You can either follow this link to log in via Bluehost or visit https://yourdomain.com/wp-admin directly from your browser to log in.)
Once logged in successfully, you will see something similar to this.
WordPress Admin Panel after you log in
Now one important note. All blog posts you write will be classified into categories. (See these as drawers or typical classifiers where the related content gets saved.)
Since your blog is empty now, let’s add categories first.
In your Admin panel, hover over Posts and then click on Categories in the menu that appears (see below).
You can fill in a form to add a new category on the next screen.
Note: After installation, WordPress creates one default category called Uncategorized; you can delete this after creating your own (or you can ignore it entirely).
Here is one way to organize your categories.
See below; I am creating a category called Blog. (To save, click the blue button.)
Let me walk you through how to add that first post now. (Note: this will be a technical walk-through only; I will revisit aspects that concern writing ideas & tips later.)
Have any questions? Write them in a comment, and I will answer you personally.
Adding a new post in WordPress
Here is precisely what to do to have your first post see the daylight.
While at your WordPress admin panel (https://yourdomain.com/wp-admin), hover over Posts , and then click Add New.
Now you see the main Editor where you can start writing.
Let me explain the most important sections you need to fill in.
In the Title section, you write what this post is about. A single sentence explaining the subject you are going to cover. (Labeled 1. in the snapshot.)
Remember what we discussed earlier? Give your readers a promise that you will deliver throughout the post.
In the Post Body section, you write the post content — deliver the promise you committed to in the title. (Labeled 2. in the snapshot below.)
Just click within one of the areas, and you can start typing.
The next important aspect is adding information about the post itself. (This makes it easier for Google to determine what the post is about and also makes it appear neatly on your blog.)
Look at the right sidebar of the Post Editor. There are different sections you must fill in. Let’s start with the Categories section.
Here, thick the box next to the sub-category where you want to classify your post.
As you scroll down the sidebar, you will also see Tags and Featured Image.
In the Tags section, add a few comma-separated keywords about your blog post to describe it (this can help search engines — more on it later).
Next, select the image that will appear just below the post’s headline (to make your post more attractive and informative).
Here are both sections shown in the snapshot below.
(Note: There are also additional sections you can fill in, but these are optional. If you have questions about this, just write a comment.)
I plan to cover Search Engine Optimization (SEO) in more detail later in the text.
Still, I want to briefly showcase how you optimize the posts for search engines (including Google).
Let’s continue with Post Editor (you should already have it open).
In the same Post Editor, look at the section called Yoast SEO (it’s at the bottom of the page). (We installed this plugin some time back, remember?)
Here in this box, you tell Google (and other search engines) everything that they need to know about your post. (Again, here are only technicalities, more about good practices, what to do & avoid is yet to come.)
Look what the Yoast SEO block looks like for this post. (Labeled sections are explained below the snapshot.)
Select the focus keyword. This is a short phrase that others will likely look up on Google. The plugin will continuously scan the post as you write based on this keyword and give you recommendations.
Preview of how your blog post will appear on the Google search result page (SERP); based on your input.
SEO score that the plugin assigns to your blog post. Red smiley is the worse score, Orange is OK, and Green is excellent.
Readability score of your post. It shows the level of readability (more tips later). Scores are the same as in the previous point (red, orange, green).
Determines the title of the post on Google results. Notice: it is automatically set to the title of your post (I suggest leaving this setting as is).
Slug is the URL of your post. Once you publish it, the post will receive its unique web address. This address is called slug in WordPress terms. Make sure that slug also contains keywords that others will type in Google.
A brief description of your blog post. This will also appear on Google results. Try to make it informative & appeal to human curiosity.
Now that you understand all the parts of Post Editor, you can go ahead and publish your blog post. (The post is not publicly available until you publish it.)
Here is how to do it.
Note: for longer posts, you want to use the Save draft button rather than Publish. (You do not want the half-baked post to be publicly available.)
At any point, you can delete the post by visiting WordPress Admin -> Posts and clicking the delete button next to the entry you want to delete.
That was it about posts — you are on top of things now.
Search engine optimization (SEO): Make Google fall in love with your posts
Reality? Google decides who is going to live and who is going to die…
All that by ranking their search results. Did you know that Google handles over 90% of all search queries worldwide? (RIP Bing, Yahoo).
So, it makes a lot of sense to be interested in how to make Google “love your content.”
If the term SEO is entirely new to you, let me explain how this works on a high level.
Google (and other search engines) have bots (crawlers) that continuously scan the web. When bots discover new content (your new blog post, for instance), they send the address back to Google so that Google can include it on the relevant results page.
You can tell that Google has to decide where to place this new content on the search results page (SERP). To do that, big G consults its ranking algorithm (which has been kept top secret).
No one knows all the factors that Google uses to rank websites… But there are proven ways to increase your chances and rank near the top of Google results. (Remember, top Google results mean traffic, and traffic means conversions & sales.)
Got your attention?
O.K.
Let me show you how to take a “good slice” of the cake by optimizing the posts to rank well.
P.S. If anyone ever promises to rank your blog “first on Google,” be assured they are lying to you.
What are search engines?
Websites that provide search services. For instance, you type what interests you and you get the relevant results in the form of links. Some of the search engines you use daily are Google, Yahoo, Bing, etc.
Do I have to optimize for each search engine separately?
Since Google is handling more than 90% of all the searches worldwide, it is enough to focus on Google only.
How much time does it take to get to the first Google page?
No one can tell this for sure. Still, you should see the first effects of your SEO efforts within 6 months.
Can I skip search engine optimization (SEO)?
I do not recommend skipping this. If your goal is to get as much traffic as possible, you must optimize for search engines. Despite that, it’s free traffic (you do not pay for a thing).
What are organic search results?
Search results that are not sponsored (paid by the website owners). These are native, quality-based rankings, and usually, the best posts/blogs/websites end up in the first results. This will be your goal — it’s completely free traffic (you do not pay a cent to Google).
Can I pay to get to the first page and skip the competition?
Yes. Google offers its ads program where you can pay to appear at the top results. More on this later in the text.
How to add your blog to Google
First things first.
Before we focus on optimizing your blog post, there is one crucial step to take: telling Google your blog exists.
Wait, is Google not smart enough to discover it?
It is… But still, this process can last much longer as Google’s crawler (bot) has billions of other pages to deal with.
What is better than telling Google, “Hey, here is my blog, and please include it in your search results ASAP”?
Not only that Google will listen, but it will also give you a dashboard where you can monitor how your website ranks and how many people click on your posts.
You will also get optimization recommendations and notifications when something is wrong with your blog. And guess what, all that straight from Google… You become a sort of partner…
And the best part? It’s completely free.
Here I present you Google Search Console. (Note: you must have a valid Gmail address to use Google Search Console — if you don’t have one, click here to create it).
Watch this step-by-step video to learn how to add your newly created blog to Google (including how to add the sitemap).
How to add your blog to Google Search Console What is indexing?
In SEO, when Google includes your blog in their search results, we say that Google indexed your content. So, Google added it to their index and the page has a chance to appear in the search results.
How much time does it take for Google to index my blog?
It takes 2-3 days (based on experience) for your blog to appear in search results (this is after you submit your website to Google Search Console — if you don’t the process lasts longer).
Will I get at the top Google results immediately?
Likely not. It takes a few months time (and the quality content) to see some organic traffic coming from Google.
What is a sitemap?
Simply said, it’s a list of all the URLs (links) that your blog has. You submit the sitemap to Google Search Console for faster indexing. (See this as a way to instruct Google what content of your blog to index — show in the search.)
Do I have to submit my sitemap every time I add new content to my blog?
No. This is one-off action. You submit the sitemap only once and the sitemap updates automatically every time you add new content to your blog. Google is also automatically notified and starts indexing the new page immediately.
How can I submit my blog to Google?
I included a video on how to add your blog to Google Search Console and how to add the sitemap. Click here to watch the video.
How much time does it take for Google Search Console to start showing some data?
The console is empty when you add a new website. This is fine as it takes time for Google to collect some statistics. In a few days, you will already be able to see how many click you got and how many times your blog appeared in the search results. Here is the link to Google Search Console where you can see all the details moving on. Bookmark it.
Keyword research done right (+ one premium tool that is free of charge)
You do not need any of these. Keep reading.
You know what… Many people shoot themselves in the foot.
They put an incredible amount of time into producing super helpful content but forget one thing…
They forget to check if people are actually searching Google for that content. In other words, is there a demand for that subject?
What do visitors type in Google exactly, and how do they express their interest in a certain subject (in words)?
Do not make the same mistake. Before you write down your post title, you should know the relevant keywords.
This is called keyword research.
I know that The Internet is full of sci-fiction-like videos taking this subject to extreme levels.
But you and I are not going to do this here.
We are evidence-based, of course, and want to get some statistics to make sure that the post is actually worth writing (and to ensure that others will find it).
Still, I do not want you to “overdo it” and spend time & energy when not necessary.
The tool I will use comes straight from Google. It’s called Google Ads.
Note again that thousands of different tools offer keyword research services, but you do not need anything else than what I mentioned here.
Google has all you need (and even more than that, plus it is free).
With this tool, you can buy ads at Google (and many other things), but we will discuss that bit later.
Now, we will stick only to the keyword research functionality.
Let’s get an idea about three things (no more, no less).
How many people search for a specific keyword (search volume)?
What’s the competition level for that keyword?
What other keywords relate to that subject?
Watch the video below to see how I used the tool to find the keywords for this post you are reading now. (You can also see how to create an account if you haven’t done so.)
Finished watching? Then go to Google Ads Keyword Planner and find the primary keyword for your next post. Also, note down other relevant keywords (together with the search volumes).
To begin your search, just type one word (e.g., travel), and Google will generate keyword ideas for you.
Long-tail keywords are usually very specific sentences of three or more words. True, these keywords are not as popular as the prime ones (e.g., “losing weight”), but ranking well for them is much easier.
See the example below. The “tomato plant” keyword is the prime one and is widely searched. As the keyword becomes more and more specific, there are fewer searches but more conversions. The more specific the keyword is, the easier to rank and the greater the conversions.
Long-tail keywords example
What is Google Ads?
It’s a platform offered by Google. You can use it for advertising on numerous Google networks, including Google Search, and on all third-party websites that use Google Adsense.
What is keyword research?
Keyword research is a process of finding the keywords (phrases) people type in Google to get to the relevant content.
Can I do this for free?
Yes. You can use the Google Keyword tool that offers the functionality free of charge.
What is the minimum search volume I should look for?
I usually limit the selection to the US region only. If a keyword has less than 1,000 searches per month, I look further. The sweet spot is between 1,000 to 25,000 monthly searches with Low to Medium competition. You can use the same rule of thumb.
What are the long-tail keywords?
These are very specific keywords that consist of three or more words. For instance, “diabetic recipes” is a keyword with many searches but also a huge competition. On the other hand, “diabetic recipes for pregnant women” is much more specific (with fewer searches) but the competition is lower. This is one example of a long-tail keyword.
Can I use the keywords with High competition?
I do not recommend this. In most cases, those keywords are dominated by big corporates such as Amazon (for online shopping for instance) and others. Stick to what is more real and where you can see the results in the near future. It is not impossible to win Amazon but it is very difficult and takes time & effort.
All I told you about keywords might not be true…
I am not messing with you. But there are some new trends you should be aware of (as it impacts your blog).
I have been in this industry since 2009. In the early days, everyone was focused on what keywords to pick, where to include them in the post, how many times, and so on…
Back then, you could see posts stuffed with the primary keyword all over the place…
Why did people do this?
Well, it worked… 10 years ago, you could get decent traffic from Google if you “over-optimized” your post and included the primary keyword in every sentence (several times).
No. After some time, Google started penalizing this content. Keyword-stuffed posts were hard to follow and ultimately unpleasant to read (poor user experience).
Over the years, Google evolved and understood one thing right.
Search engine optimization (SEO) should not be different than “optimization for people”. After all, people are the ones reading the posts.
And Google got it right…
The more readable and easy-to-follow the post is, the more people will enjoy the reading and use Google again to find other posts.
Because of all this, Google’s attitude is to “write content for people and not for search engines.”
Based on the latest trends, here is how Google’s algorithm weights different components when ranking your post.
Google’s ranking algorithm components.
Let me explain this one by one (the most critical components first).
Trust/authority of your domain | How old your domain is and how much Google trusts it based on the previous history and the existing content (for new blogs, this is very low).
Link popularity of the post | How often do other websites, social media, and blogs link to your blog posts? (This you can work out by writing amazing content others will love to share.)
Anchor text of the external links to this page | What text do others use to link to your post? (If others enclose a link to your post in the text “Diabetic recipes for pregnant women,” Google takes that as a signal that your blog is saying something about the topic — the more links with this text, the stronger the signal).
On-page keyword usage | How often do you mention a certain keyword in your post? (This gives an excellent clue to Google about your post’s topic.)
Hosting data | Is the company where you store your website credible enough? (You got this step right if you used Bluehost.)
Traffic + CTR | What is your current number of visitors, and how often do others click on your post in the search results compared to clicking on other posts?
Other | All other factors go here.
Main takeaway?
Optimize your posts for humans (make them easy and pleasant to read + super informative and helpful).
Do the keyword analysis and include the primary (+ a few other relevant) keywords in the post (but do not overdo it).
Overall, take the whole buzz about “keyword optimization” with a grain of salt…
P.S. Blog speed is not included in the graph, but it is one of the crucial factors as well (we already talked about this).
How to optimize posts to rank 1st on Google (while optimizing for humans at the same time)
Look…
You already know more than 90% of people about blogging. Believe it or not, you can do wonders with this knowledge (earn a lot)…
To make good even better, here is the bread and butter of search engine optimization.
Let me show you how to optimize the post to appear high on Google results (and bring you tons of visitors and conversions).
(All this while keeping user experience & readability at the top level.)
Ready?
Here we go. Section by section.
a) Type your focus keyword in Yoast SEO
Yoast SEO is your friend. Once you finish the keyword research, enter your primary keyword in the Yoast SEO box. (The box is located just below the post form.)
Yoast SEO is going to monitor the post as you write and give you an indication of how well you optimized the post for that keyword.
b) Post Title
Your visitors see this first (already in Google results or social media feeds). Since the attention span is very brief nowadays, keep the title short & the point.
The only task of the title is to grab users’ attention so that they click & visit your post (no more and no less).
It’s the point when the potential visitor stops considering other links/news feed stories and decides to click on your post…
Title of this post in Google search results
Here are a few points to keep in mind for the best post title.
Include your primary keyword at the beginning of the title (combine this with the below points)
Use the primary keyword only once in the title (avoid keyword stuffing)
Combine the keyword with a phrase that appeals to humans (enclose the phrase after the colon or in the brackets as keyword: phrase or keyword (phrase), e.g., XYZ air cooler is HERE: Why swelter through another hot summer?)
Make a promise you will deliver in the post body (e.g., How to start a blog that makes money)
Don’t tell the complete story so that you appeal to visitors’ curiosity (e.g., How I Made a Fortune With a “Fool Idea”)
Show them ways/reasons as people like learning how to do new things (19 Ways to… 8 Reasons why… How to…)
Appeal to the fear of losing something valuable (e.g., Top doctors say to throw this vegetable into your garbage)
Challenge their common sense and write something unexpected (e.g., How advertisements can stop people from buying)
Leverage fear of loss: it’s the strongest motivator out there (e.g., How to improve your marriage vs. How to stop your divorce or lover’s rejection; 50% of people have high blood sugar levels without knowing: common diabetes symptoms)
Thanks to the killer post title, you have a visitor on your blog. What happens now?
In the next 30 seconds, the person will decide whether to read your post or send it to the “graveyard of the stories untold”…
They will skim through (scroll up & down), look at the post images, and read the first paragraph of your post.
The title has done its job — made the visitor read the first line of your post.
c) Post Body: Post Intro
After a killer post title, your visitor reads the intro paragraph of the post.
More precisely, they read the first sentence of the intro paragraph…
What’s the goal of that first sentence?
Well, to make them read the second sentence…
Godfathers of copywriting (Joseph Sugarman and others) call this method a slippery slide.
Your reader cannot stop reading the post because every sentence makes them want to read the following one…
Sentence by sentence, all through the end…
Where you ask them for a specific action (e.g., to buy a product or subscribe — this is called Call to Action, and we will talk about it later.)
So, how do you write the intro that sends the visitor down the slippery slide path?
Write two to three sentences in the intro section (use a strong typeface).
Include the primary keyword once or twice in the opening.
Make the first sentence of the intro very, very short (so they read it). You can even use one-word sentences such as O.K., All right, etc.
Start by asking the question the visitor wants to know more about (e.g., Want to learn how to make a blog that makes money?)
Make a promise & tell them what’s on the truck for them (e.g., You will learn how to grow your blog from $0 to at least $1000 a month in passive income — all that in under 2 weeks).
Don’t promise what you can’t deliver (people will find out if you lie to them; commit to something and then deliver it, simple as that).
Tell your story & why they should care (read the intro of this post for an example)
Present reliable statistics that persuade the reader (e.g., In the last 5 years, every other employee of Forbes 100 migrated to another country for a better salary. Is this for you in 2023?)
d) Post Body: Graphics
A picture is worth a thousand words… You heard of this saying, right?
Why not use it to enrich your posts further (show, don’t tell)?
The reality is that the reader only scans your post at first.
And they do it to find out two things: a) is the post helpful enough b) is it easy to follow?
Images, GIFs, and infographics add value to your blog post but also serve one other essential purpose…
Think of these as rest areas. The reader needs a pit stop to “charge the batteries” before reading further.
After 300-500 words, try to include one relevant image, GIF, or infographic.
It will make the post easier to read and more informative (and Google will love it more).
Why?
Because Google is also a search engine for images.
The more images you add, the greater your chance of ending up in the image search results (appeal to the people who prefer the visual search & get some extra traffic).
A few last points here:
Include the primary keyword in the image filename (e.g., how-to-start-blog.png — notice, do not use articles in the image name).
Optimize the images to use less space (so the post-load time is not impacted).
Provide the metadata to every image (graphic) and use the primary (and other) keywords here as well.
(Optional) Add captions to your images.
Got it? Great.
Watch the video below to see how you can add an image to your WordPress post (including how to optimize images to rank well on Google).
e) Post Body: Paragraphs, subheads, lists, bullet points
Remember
SEO optimization = optimization for humans*
*Still not 100% accurate, but it is coming closer and closer every day.
I have a few more tricks on my sleeve that I want to share with you.
Here are my tips for the best user experience & engaged readers. (Yes, that is how you send them down the most slippery slippery-slide in the world.)
Use subheadings to provide more “pit stops” to your readers. Typically, introduce a new subheading after 300 words. (Subheadings are h2, h3, h4, h5, and h6 tags.)
Include your primary keyword in the subheadings (once to twice), BUT DO NOT OVERDO IT.
Use the other relevant keywords in the subheadings occasionally.
Insert links to your other relevant posts.
For the long posts (2,500+ words), consider adding the table of content (and link every item to the appropriate section)
Add lists after the long chunks of text so the reader can also rest here.
In 300 words, use your primary keyword once to twice.
Include bullet points to capture the reader’s attention when they only glance over the article (at the early stage).
Lists and bullet points are also typical “anchors.” Readers usually decide to pause here (because it’s easy to find where they left off).
Add videos. There is no one size fits all. Some prefer reading, while others prefer watching. Ensure your blog post covers both alternatives to keep most of your readers engaged.
Make your sentences short, and do not use any advanced/scientific vocabulary (unless necessary).
Use dividers for plenty of room around the sentences.
Humor is subjective (use it cautiously because you might lose some readers if they do not like the joke).
Keep it personal — always use “you” and talk to the reader like a friend (avoid the passive voice).
If you are a company, never use “we” — people look right through it. Instead, use “I and my team” — it’s much more personal.
At the beginning or end of the post, introduce yourself to the reader and present your credentials briefly.
If you look carefully, you will see I applied most of these to the post you are reading now… See how I guide you through the text?
You can do the same with your readers…
Just copy/paste the style.
(If you want more writing tips, contact me here, and I can send you some more “secrets” I use.)
You have just learned to develop a post that the reader cannot help but read right through (to the end).
What’s so special about it?
Well, this means the reader will see and consider your proposition at the end of the post (because they have just read it)…
In other words, they will see some “call to action” (CTA).
Be it a newsletter, an affiliate link, or your own product offering. (I will talk more about the selling part in a bit.)
But now, I have to disappoint you…
Even the best post is not enough for the reader to convert to a subscriber or a paying customer.
Do you know what 95% of your readers do a moment before subscribing to your list (or converting to paying customers)?
They go to your About page… To find out if you are credible enough and if you are “real” (can I trust her?).
(That’s right — they need the final push.)
The other most important page is the Contact page.
Here is what to include (and void) in these crucial pages so that every reader converts.
About Page:
(It’s not about you but about your reader.) Think of who is reading the page and why… What are their needs? Then present the story that positions you as an authority that can help solve the problem.
Write about why you qualify to offer advice on a certain topic (e.g., past experience, education, courses you have done, achievements).
Have you already had paying clients in the past? Make sure to include that (and what they say — testimonials).
Tell your story. Share the personal struggle you have been through on your journey until you finally succeeded.
The About page is not your dairy. It is all right to spend a few paragraphs discussing your hobbies and lifestyle, but do not overdo it.
If you feel comfortable, include your photo. (We all feel more comfortable if there is a “living being” on the other side of the screen — that is your competitive advantage against ChatGPT as well.)
Every line of the page should reflect what you can do for that reader to make their life easier.
Provide your (or your business address). People want to know “where to find you” and trust more the physical address.
Include your LinkedIn profile link and perhaps other socials if you feel comfortable (even Facebook or Instagram). (This persuades the reader that you really exist.)
Add your phone number (and landline if applicable). Don’t worry; they will not call you (phone number builds trust).
Make sure that your contact form is working. Just in case, include the email they can use as a backup.
(Optional) Consider adding your company to Google Maps.
Want to add the About and the Contact page to your WordPress blog? Watch this video.
How can I add my About and Contact page to the menu?
It would be best to create the Services and Legal pages next to the About and Contact pages. Explain what you can do for your readers on the Services page and mention the pricing (you can also leave pricing to be on-demand). Legal pages are Terms of Service and Privacy Policy. The legal pages are required if you want to apply for paid ads platforms (e.g., Google Ads, Facebook Ads, Quora Ads, etc. (more on it later).
Congrats.
You have just learned the crucial elements of a post that sells.
But wait… There is more…
Do you know what products sell best? Or what post ideas convert well (and how to get some free traffic rolling)?
What if I showed you exactly that? Read on to find out.
Some people won’t confess it, but this is the reality (& why we invest so much time in writing)…
Both you and I need $$$ to live up to our dreams (nothing to be ashamed of here).
Of course… Writing also brings a particular joy (for example, time flies by), but still…
The primary purpose of your post is to make you money.
What post formats/ideas sell the best?
I will tell you in a bit.
Post content ideas that sell the best
At the core, human beings have the law of reciprocity.
“You scratch my back, and I’ll scratch yours.”
It’s the same with your readers… They want something from you (and they want it upfront)…
Heard of “Give Before You Get”?
Exactly.
Since you are a blogger, you will give free content to your readers.
The content you could have charged for (but you didn’t). (If you can’t sell it, it’s not good enough.)
So, your posts must be super helpful and give tons of value for free. (Notice that this is what I am doing right now…)
What post-content formats can deliver colossal value (and convert well)?
Here are the ideas that always work (you can apply them to every niche).
How-To Guides | Show exactly (step-by-step) how to do (or avoid) something they care about (e.g., How to get perfect muscles and how to avoid losing them; How to stop smoking in 30 days or get your money back).
List Posts | Your readers love recommendations. Give them alternatives and let them choose (e.g., A free new report on 56 emerging growth stocks).
Recipe Posts | Everyone needs food-related guidance. Teach your readers how to prepare a particular meal that helps them with something (e.g., Get Rid of Extra Weight Once and For All [weekly food plan included])
Tutorials | Teach your readers to use a particular program, machine, or software (e.g., Master your Photoshop skills in 3 easy steps).
Reviews | People want to know what they are buying. Tons of readers are just waiting for new product releases and can’t wait for the first reviews (e.g., I tested 5 new features of the just-released iPhone 14)
Resource (tools) page | This is a static page on your blog where you disclose the tools you use to manage the business. Many readers will find this super-useful as they don’t have to “boil the ocean” (and you can earn from affiliate links). It’s a common practice to put this page in the main menu next to the About/Contact page.
Before-After | Seeing is believing. Show your readers how they can do something incredible (works best if you have already gone through the process). (E.g., Here’s a Quick Way to Get Rid of Eyeglasses Once and For All: Non-invasive Laser Treatment]
Any of the post formats will do. Just remember one thing.
Deliver the value.
(So much so that others think you are a “fool” because you give it away for free.)
You want to have at least 10 high-quality posts on your blog. If you have 1 or 2 readers might get the impression that you are not serious or active enough. Still, start by writing that first post (and aim at 10).
How long should my post be?
Try to keep it to 2,500+ words. Google loves long posts where everything is on one page.
What should be the minimum word count for a post?
When the subject you cover is laser-focused and specific, you can write posts that are very short & to the point. These posts should have at least 500 words.
How do I know what's standard wordcount in my niche?
Search Google for the primary keyword of the post you are writing. Skim through the first results and see how long those posts are. Aim to have more topics covered than your competition.
What if I do not know much about the subject?
No worries. You can find the top 3 posts on the subject and create one that covers it all (+ some more) — people will rather read 1 than 3 posts. Note: never copy other people’s content word-to-word. Always bring your own perspective and write in your own words.
Can I pay someone to write for me?
Certainly. There are freelancers that can write the post for you. Still, this can be expensive and you better learn if you write it yourself.
How often should I add posts?
The more you publish, the better (of course, it must be quality content). Try to aim at one quality post per week. If you can do more than that, great. If not, try to post at least once in two weeks.
How many hours per day should I write?
I would say that the maximum you can write daily is 4 hours. On the weekend, you can do 2 hours in the morning and 2 hours in the evening (it’s practically impossible to make 4 hours in one go). And when you are less available, it’s also okay if you squeeze 30 minutes for writing
(but not less than that).
Quick ways to immediately monetize your posts
Blogging is not easy. In fact, one of the most difficult things I have done is writing…
(And I did a lot of complex work, such as engineering apps for global banks and investment funds — and man, writing is much harder…)
What’s my point?
If it was easy, everyone would do it…
This means you have to put effort into what this post teaches you.
If you don’t, it’s practically impossible to make any money.
But if you do… This can be your golden goose that lays the golden eggs…
Before I tell you how to monetize your blog posts, let’s summarize where you should be at by this point (so that monetization makes sense).
You have a WordPress blog that is up and running (on your own domain name, use Bluehost for the best performance)
Your blog looks decent (design-wise) and has all the plugins I recommended earlier
Any page of your blog scores an A, B, or even C at GTmetrix (your blog is fast enough)
There are at least 2 slippery-slide posts (2,500+ words each) that are well-optimized for search engines and humans (aim at 10 posts)
Your blog contains other crucial pages such as About/Contact/Legal Pages.
Missing any of the points above? Just write a comment, and I can help. (But don’t implement monetization until you tick all the above checkboxes.)
O.K.
Now that we have this out of the door let’s discuss ways to earn money with your blog.
(Note: traffic is also essential; we will discuss this later.)
Proven methods of earning money with a WordPress Blog
You have a few options at the table. Let’s look into each.
Affiliate Marketing | You earn by promoting a particular product/service in your posts. There are affiliate networks (such as Amazon Associates and Impact) where you can find products that align with your post topic. Once you register and pick a product, you will get a unique affiliate link to add to your post. Then you get a commission whenever someone buys the product through your affiliate link (typically a percentage of the purchase price, e.g., 2% – 10%).
Sell Your Own Product | Affiliate links are fine, but you get only a tiny portion of the cake. Why not create your own product and keep the entire amount? Think of training materials, courses, software, illustrations, and ebooks. Make one and offer it throughout your blog posts.
Sell Your Own Subscription | If you can pack your product into a subscription, that would be the best. Subscriptions make you money every month as opposed to one-off purchases (e.g., eBooks). All tech giants (Netflix, Amazon, etc.) have recognized the potential of subscriptions and mainly focus on that offering.
Freelance Gigs | As you add more and more to your blog, readers will perceive you as an authority on the subject. Not far from now, you can get requests for some paid work (best-in-class freelancers make up to $1,000 per hour). Ensure the readers know that you offer these services & how they can contact you.
Ad Space | These are traditional ad networks where you sign up and include banners/links to your posts. Every time someone clicks the link, you get a tiny amount. One quality ad network is Carbon Ads. Another option is traditional Google Adsense.
Start by joining one of the affiliate networks. Then browse for the best-selling products for your primary keyword (& do the quality research of, say, top 3 products).
After you are confident about what product is best-in-class (and have possibly tried it yourself), include the promotional links to your post.
Wait and see how your readers react to it.
Do they click on those links at all? (If yes, it means that the product fits your audience.)
Do they buy?
Good, now you can build your own product and keep all the profit.
Affiliate products are excellent for getting to know your audience better. What products work best for them (and what would they buy)?
Once you have a clearer picture, you can develop your own product (course, training, ebook, other material) that you can sell & keep 100% of the profit.
Remember here that one monetization method does not exclude others.
In parallel, you can offer freelance services (to maximize your earnings), and in the long term, you can focus on repositioning your product to be subscription-based.
Believe it or not, that’s all there is to it…
Let me show you something else now.
…the crucial step where everything “clicks” together.
What is the best monetization method for my blog?
There is no one size fits all. You have to test everything to find what works best for your readers. I suggest you start with affiliate links and then develop your own product.
Where can I earn the most money?
Develop your own subscription-based product. There is a reason why all tech companies have most of their products positioned as subscriptions.
How much time do I need to start earning?
This depends on your efforts. The “Taxing” period for most of the blogs is around 6 months (after that, good blogs take off & make lots of money). There are exceptions, it all depends on your efforts.
When do you use the traditional Ads (traditional banners)?
Only if you have massive traffic — 20,000 monthly visitors or more. It makes no sense to use this option if you are only starting.
How to get free traffic (that converts)
It’s all set. You have got a killer blog, and it’s time to let people see your masterpiece.
Let’s flood your blog with thirsty readers and get the first conversions rolling.
Here are 12 methods to get free traffic (without paying a penny).
(Remember, every visitor counts.)
Add a link to the signature | Include the link in the signature of all your emails, forum posts, and blog comments. See here my email signature — this is how every email I send ends. It can sound silly, but it works (you get more traffic).
Add a link to your social media | Have Instagram/Facebook/TikTok/LinkedIn? You have to use every possible resource at this stage so that your blog takes off of the ground. Mention a link to your blog (+ what’s there for the reader) in the profile description (check my LinkedIn profile to see how I do this).
Comment on related blogs | Find blogs that cover similar topics. Read their posts and submit a sincere comment where you add some value (don’t SPAM). Most blogging platforms will allow you to include a (back) link to your blog. A typical example is finding a typo and posting that as a comment (the post author will approve it 100% as you are helping them as well).
Publish on social media | Create a Facebook group dedicated to your blog (you might think that Facebook is dead, but it is not). Do the same with Instagram, Twitter, Pinterest, and TikTok. Invite all the people you know to “like” or “follow” your newly created page. 3-5 times a week, add new posts (pins) relevant to your social followers and backlink to your blog post.
Guest posting | Approach a few authors with established blogs and offer to write a post for them. They can publish this post on their blog and include a link at the end, giving you credit for the writing. Always pick blogs that are slightly more developed than yours (it’s hard to get to the globally recognized blogs when you are new — stick to what’s realistic).
Repurpose your content | Say you have a 2,500+ word long ultimate guide. You can rewrite a shorter version of this post (300-500 words long) and start responding to questions on Quora.Com, and Reddit.Com. Use Medium.Com to do the same. Google loves these platforms and ranks them high in search results (you can get hundreds of visitors daily if you write a helpful answer).
Start YouTube channel | Google is the first search engine in the world. Do you know what’s the second largest? Yes, it’s YouTube. Many people prefer video searches straight away. Repurpose the post’s content and pack it in a video format. If you are uncomfortable with cameras, you can always use an AI-generated voiceover and present it as slides (screen share). (Don’t forget to add the main (+other) keywords to the video title, tags, and description.)
Start collecting emails | Have a few friends interested in the topic? Ask them to pass on their emails so that you can send them valuable resources every now and then. (I will explain this in more detail later but keep it on the radar for now.)
Keep doing SEO | In the beginning, you will see only a few visitors from Google. But as time passes, there will be more and more. Remember, SEO is a long-term investment, and you should optimize each post well (no compromise). This is the most significant source of free traffic out there.
Encourage discussion | Offer your readers free help if they ask for it in a comment. This will sparkle a discussion. You can build a lovely community that promotes your blog as they become more and more engaged. Sure thing, you must help them with their questions first.
Link to your other posts | Not all your posts will be equally read. Some will get a lot of traffic, while others will get none. Ensure you include links to your other posts in the post body (internal links). Not only that this is great for SEO, but you will also keep the visitors on your blog longer (and get traffic to your other posts).
Start a podcast | If you feel comfortable, you can start a podcast where you will be covering burning questions on the subject. Later, you can invite guests that are experts on the topic. Many people prefer listening, so this is how you also tap into that market.
You want to “spread your net” as wide as possible here (and meet your readers where they are)…
Watch this video to see how you can collect helpful statistics about your traffic (including daily users, traffic sources, locations, age, behavior, and much more). (I use Google Analytics for all my projects; it’s 100% free.)
What if I don't have time for everything?
That’s all right. If your efforts are limited, pick one or two channels and give your best there (provide super-useful content). Of course, the more options you cover, the more free traffic you get.
How much free traffic can I get?
You can get unlimited traffic, but I suggest starting small (and not having huge expectations). Especially in the first month, aim to have 5-10 people visit your blog daily. This will grow (snowball effect) as time passes.
5 paid methods to get unlimited traffic to your post [tested]
There is a “shortcut” you can take to bring tons of traffic to your blog.
Websites like Google, Instagram, Facebook, LinkedIn, Quora, and Reddit offer paid advertising.
But what does this mean?
You can pay Google to place your blog post above all other results for a particular keyword. (In a sense, you can cheat on your competition.)
Instagram, for instance, can show your recipe ads to people who are into a particular diet (e.g., keto diets). (Most other global websites have advertising programs as well.)
The only catch is that you must pay for every visitor that comes to your post this way.
Over the years, I have spent tens of thousands of dollars on paid advertisement (for my own projects only).
Here are the top 5 advertising networks that offer the best value for money.
Quora Business | Quora ranks incredibly well on Google. The ads you buy on Quora will appear within questions related to a particular keyword that you specify when creating the ads. Quora Ads is straightforward to use and offers quality traffic (coming straight from Google) at a reasonable price.
Google Ads | Google is the biggest search engine globally (having more than 90% of the market share). You can use Google Ads to “skip” the competition and position your blog post first (or second) in Google search results. The downside is that Google Ads costs more (for the same keyword) than other networks.
Facebook Business | Lets you run the ads across the entire Meta network (Facebook, Instagram, WhatsUp, Messenger). You only need to specify the audience’s interest, and Meta will serve the ads precisely to those people. Price-wise, Meta is cheaper than Google but more expensive than Quora.
LinkedIn Business | The biggest professional network in the world. You can show your ads to people of a particular occupation (e.g., programmers or doctors). LinkedIn is way more expensive than any other network, but it can be extremely useful in targeting high-profile users.
Reddit Ads | Reddit is another Q&A platform. If you join their ads program, you can show your ads within particular questions that match your post topic. In my experience, Quora works better than Reddit, but Reddit is cheaper than Quora.
But wait, what’s the best platform?
There is not one size fits all. You must test it and see what works best for your audience (more on the results measuring is coming up).
I suggest you set a daily budget and test several variations of your ads (including the audience settings — e.g., location). Make one change at a time and track the results.
You can quickly increase your daily spending once you find the winning ad setup.
But be careful here: Don’t let the budget go out of hand, as it can burn a hole in your pocket if you are not cautious.
Have more questions regarding paid ads? Write a comment.
The minimum you can spend on most platforms is $5 a day.
How many visitors do I get if I spend $5 daily?
It depends on the country you are showing your ads in. If it’s the US, you can expect around 10-20 visitors for this amount. If you decide to show the ads in countries such as China (or Africa-based countries), you can expect up to 100 visitors for the same amount. Ads platforms let you control this setting.
How often should I tweak my ads?
Let an ad run for at least three days. (This is needed so that the ad generates some statistics — e.g., how many people click on it daily.) When you have this baseline, you can make further adjustments to improve the ad performance. For instance, you can change the title and see how the ad performs in the next 24 hours. Do more or fewer people click on it?
Will I see the results immediately?
You will see the traffic coming in immediately. Still, you cannot expect to generate sales from day one. Most ad platforms are learning along the way and track what your users are doing on the website and how much time they spend. The longer you use the ad platform, the more quality traffic they send your way.
What is Pixel?
It’s a technology for tracking users on your blog. Where do they click, for instance… Most platforms use this technology to let you optimize your ads for a particular action. Say you want more users to contact you via the contact form on your blog. You can “teach” Facebook or Quora pixel what this action looks like on your blog (e.g., a user clicks the Contact button, fills in the form, and hits Send). The Pixel will then monitor the profile of users that completed this action and show your ads to those who will likely do the same.
Sales funnel (the only thing you must do 100% right)
If you want your blog to be successful, you must understand the sales funnel. (This is where it all comes together.)
Let me explain…
Look at the image below. What do you see?
This is a real-world funnel. It’s just a tube (pipe) that is wide at the top and narrow at the bottom (with a gradual transition).
But wait, what’s so special about it?
This analogy is helpful because your blog is just that — a sales funnel.
Your sales funnel converts an uninterested reader into a buyer.
Think of it once again. You send a reader to your blog post (via paid ads or other free methods), but this person is only mildly interested in what you have to say (almost ready to close the browser tab)…
(No way they will buy anything from you at this point.)
But then… They skim through the subheadings, glance at the photos, read a bullet point here and there… And the article seems pretty informative. Finally, they decide to read the first sentence.
In a blink of an eye…
They are down the slippery slide, unable to stop before reading the entire post.
The last point in your post (funnel) is a call to action (CTA). CTA is a proposition you make to your reader (you ask them to do something for you).
The reader now thinks, “Hmm, this post is very helpful, and the author seems credible based on what I see on the About page.”
(In other words, they realized they could benefit even more from your blog in the future.)
This is the moment when the reader gives something back to you (e.g., signs up for the email newsletter, requests a free brochure, or even orders the product directly).
The trust bond has now been established between you and your reader. (You have their email now with their permission to write them when you have something they can benefit from.)
Remember, the bigger the ask, the more trust you have to build with readers (the more you have to give to them upfront).
This logic is at the core of every sales funnel. All money-making blogs do precisely what I described here.
Keep this in mind, and your blog can do wonders; forget it, and no one will ever buy.
Simple as that…
But why NOT offer first-time readers to buy immediately (why is this hard to do)?
This is now very important.
Read on to find out why.
What is sales funnel?
It’s a mechanism that you use to convert mildly interested readers that come to your blog almost accidentally into loyal readers (that buy from you). Simply put, it’s everything that brings the reader one step closer to buying your product.
How many sales funnels should I have?
Your sales funnel consists of many small parts that work together. For instance, a super-informative post that offers a newsletter or a free course in exchange for the reader’s email. You combine this with an email campaign that runs automatically and allows readers to buy a product/service you offer (+ offers additional info about the topic).
What's the best sales funnel?
There is not a single correct answer. If you follow this text end-to-end, you should be on a pretty good path to having a killer sales funnel.
But what if I am not a marketing savvy person?
You don’t have to be. It’s already an awesome start that you are reading this text since it covers 95% of what you need to start making money. Just keep learning and the sky is the limit.
Turn every visitor into a loyal subscriber
People do not buy on the spot (especially not first-time visitors).
Ten years ago, you could write a solid post and immediately bring up your offer. This does not work any longer. That ship has sailed…
The sale is a matter of trust. Your readers will only buy once they feel confident you offer the best option possible. (This means you have to prove yourself and do that continuously.)
But what is the best way to build this relationship (and sell ultimately)?
You must add an email sign-up box to your posts and offer something valuable in return (be it a brochure, free course, template, extended post, or PDF).
If the deal is good enough, the reader will give you their email in exchange for the material.
Here comes the second crucial part of your funnel (the first is the slippery-slide post with CTA).
Now you have to nurture the relationship… And you do that by building a welcome email sequence that automatically gets sent to each new subscriber.
I personally use Aweber.com for this (it’s not ideal, but it’s more than what you need to get started, plus it has a free plan). To create the email sequence, click here and then hit “Create Campaign”.
You think, “What’s so special about the email sequence”?
Let me explain.
The sequence should ideally contain 10+ emails that “hit the problem on the head”. (Each email gets sent after a couple of days — e.g., after 3 days.)
Over the entire month, your reader can “get to know you better”. (It’s a two-way street: you also get a chance to position yourself as an expert in the niche you selected.)
But wait, when do I finally sell?
After 2-3 emails into the sequence, you can start promoting your paid material (eBook, subscription, affiliate links, etc.).
Most of the subscribers won’t act on the first offer, but they will have it somewhere at the “back of their mind”. (Perhaps they just don’t need it right now.)
Message by message, the reader will start considering your offer and finally buy from you (because they trust that you can solve their problem).
That’s really all there is to it.
You simply have to be present and close to the reader (with your email sequence + newsletter) whenever the “moment is right” for the reader to convert to a buyer.
For instance, whenever my reader thinks, “I really need to get my blog up and running”… I immediately want them to remember, “Oh, someone is already writing me emails about blogging; what was his name… oh, Igor”.
Some of the emails in my Aweber email sequence [a course that teaches people how to get started in the tech industry]
You want to do the same with your readers.
Try it, and you will see tons of subscribers and conversions.
(The saying “money is in the (email) list” has never been more true; apply what you’ve just learned, and you’ll see for yourself…)
What is an email sequence?
It’s a set of emails automatically sent to every new subscriber. Typically, there is a 2-3 days pause between the emails (so that you don’t overwhelm the readers).
Where do I create an email sequence?
Companies that offer this possibility are called email service providers. They are a one-stop shop for all email communication, including email collection, messaging, email sequences, and much more. The one I use and recommend is Aweber.com (there are many others, such as Mailchimp.com).
Is this free?
Many of the providers do offer a free plan. For instance, with Aweber.com you do not have to pay anything to get started (you only pay when your business overgrows the free plan).
Who writes these emails?
You write the email text and organize the emails into a sequence (with a drag-and-drop text editor at the email service provider). After that, it’s a fully automated process that your email service provider takes care of.
What's the ideal pause between the emails?
It depends on the email length. If you write emails 500 words long, it’s OK if your sequence fires every day. If it’s a longer email (1500+ words), it’s more reasonable to have a 2-3 days pause.
How do I use the email sequence as a sales funnel (to make money)?
Make sure your emails provide a bunch of value for the readers. You can then include a link to your paid service (or affiliate link) at the beginning and at the end of emails.
How many emails should I have in the sequence?
This depends on what you are selling. If it’s, for instance, a course up to $70, the email sequence should be at least 10 emails long. For the products/services with a higher price tag, consider sequences of 20+ emails.
How to get people to enter the email sequence?
You offer a free course to your readers (lead magnet). It can also be a PDF/brochure/test that interests them. You give this away in exchange for their email (and permission to receive the related material).
What happens after the sequence ends?
You should keep building relationships with your subscribers even when the sequence finishes. Now they know you much better, and you should send an email broadcast at least once a month (about the relevant topic).
How to measure the success of your blog (+ what to expect)
O.K…
I told you almost everything you need to know except one crucial piece…
Do you want to know if your blog is doing good (or bad)?
Or how many new subscribers and sales can you expect to get?
The measure that can tell you all this (+ much more) is called
CLICK-THROUGH RATE (CTR).
Click-through rate (CTR) is the number of people (out of 100) who undertake a particular action you want to track.
For instance, if 100 people see your ad and 3 out of those 100 people click on the ad, the CTR for your ad is 3% (CTR is always expressed in percentages).
I want you to track CTR for every critical aspect of your sales funnel.
Why?
Because this is the only way to know precisely if your marketing efforts are paying off.
Imagine that you have bought Facebook ads for a blog post. How do you know if the ad is well received by the audience? Or how do you compare which ad version is better?
The answer is this.
Look at the CTR of the ad (the higher CTR, the better).
Almost all the ad platforms I mentioned offer this metric out of the box (so you don’t have to calculate it manually). (For instance, if you buy Quora ads, you will see CTR for each and every ad.)
(CTR will become a kind of obsession as you dig deeper…)
(It’s not an exaggeration. If you don’t track these, you are shooting in the dark…)
Here are the crucial CTRs to watch for.
(Note: I call this metric CTR all the way — sometimes it is more suitable to use conversion rate or open rate because we are not talking about clicks every time. I suggest not paying that much attention to the wording but to the logic.)
Paid Ads | You want to track the number of people who clicks on your ad compared to the number of people who have seen it. For instance, if 3 out of 100 people click on the ad, your CTR is 3%. Compare the ad variations based on this to achieve the highest CTR possible. Changing something in the ad? See if CTR increases or decreases to understand if the change pays off.
Email Subscriptions | You’ve set up an email newsletter sign-up form that appears on your blog posts. The most important CTR to watch here is the number of people who subscribe vs. the number of people who see the form. If 100 people saw the sign-up form and 5 of them subscribed, your form CTR is 5%. Keep changing the sign-up form elements until you reach the maximum CTR. (Giving something away for free typically increases CTR — e.g., a free course, PDF, template, etc.).
Email Open Rate | Your subscribers will receive emails from your newsletter (in an automated email sequence). The critical CTR to watch for here is the number of people who open your email compared to those who got it. For example, if you have 100 subscribers who got an email and 20 opened it, your CTR is 20%. (Experiment with short email titles and communicate the value to the reader as early as possible.)
Affiliate Links Open Rate | If you monetize the posts via affiliate links, here is the CTR to look for. Track the traffic you send to this post vs. the number of people who click the affiliate link. If you send 100 people to the blog post and 30 of them click on the link, CTR is 30%. (If the number is too low, you may want to increase the affiliate link font size or add it at several different spots within the post.)
Affiliate Links Conversion Rate | This CTR makes you money. It shows how many people bought a product from those who clicked on the affiliate link. If you promote an affiliate link in your posts (or email sequence) and 100 people click on it while 3 of them finalize the purchase on the affiliate website, your CTR is 3%.
Personal Product Conversion Rate | Developed your own premium material such as course, workshop, eBook, or other training? This CTR helps track the number of people who bought the product compared to the number of people who saw the sales page (a.k.a. the landing page). The landing page is where you typically offer the visitor to buy the product (where you have the “Buy Now” button). If 15 people buy your course (out of 100 who visited the landing page), your CTR is 15%.
You may think now, “All right, but what’s good CTR”?
Don’t listen blindly to what others tell you (me included) — that’s their CTR. You must test it for yourself and see what CTRs you get from your audience (every audience is unique).
Once you get the baseline, work from there to optimize CTR more and more.
Still, here are some rule-of-thumb CTRs that you can expect on average. (Please note that this is only the average number — some will score much more, but some a lot less.)
Roughly speaking, these are the numbers you can expect to see.
If you pay for ads, you can expect a CTR of around 1%. Is your ad scoring lower than this? Then experiment with ad variations and rotate ads. Are you scoring more than 1% but less than 2%? This is a great result. If your CTR is constantly higher than 2%, it does not get much better than this (5% is the maximum I’ve seen)…
Typical newsletter sign-up CTR is around 2-3%. If you offer something valuable in exchange for the reader’s email, you can bump it to about 4-5%. Do you mind showing a pop-up sign-up form? Try OptiMonk.com for this; the conversion rate you can get is around 6-7%.
A good open rate for your email campaign is 20% and more. If you get less than that, try working out the title and make it shorter + more to the point. Sweet-spot is around 20-35%. (I’ve never seen an open rate greater than 48%.)
CTR of your affiliate links will usually be around 20-40%. (Expected if you build the entire post around the affiliate product.) Getting less than that? Find out if you are sending the right audience to the post and if the affiliate product matches the post’s content.
Expect a conversion rate of around 1% on your affiliate links (1 in 100 will buy). Anything above 1% is already an excellent result. The rates here do not get much above 4-5% (in my experience).
Conversion rates on the product you develop are actually much higher than the affiliate conversion rates. You can expect a conversion rate of around 10% (10 out of 100 buy). Depending on the relationship with the audience, this can even go to 40-50%…
Note here. The list assumes you will use permitted techniques and legit ad platforms to generate your CTRs.
There are ways to generate CTR on an ad of 90% if you resort to pop-unders and other bad practices. Since this is the wrong way to go about blogging, I recommend you stay away from this entirely — it’s simply not worth it).
Congratulations, you have just finished reading the most informative blogging article ever developed…
…on the face of this earth in our galaxy for all times ever.
You’ve gone a long way…
By this point, you know more about WordPress (blogging) than 9/10 people.
I tell you this as someone who has created hundreds of WordPress blogs for my customers worldwide (and touched even more websites for quick fixes/maintenance).
What is important now is that you have the toolset to start a blog that makes money.
In this text, I explained some WordPress & blogging basics and showed you bits & pieces on how to start a WordPress blog (+ how to bring it online).
Then we went ahead with plugins and themes to prepare your blog for the first traffic.
But we did not stop there…
We covered money-making possibilities, including finding the right niche, getting the right keywords, and writing the initial posts (that sell).
Since a blog without traffic is good for nothing, I revealed a few tricks to get free traffic (also, how to keep the visitors & how to convert them into email subscribers).
With Charry on the top, I taught you how to choose the right monetization method for your blog & how to achieve the maximum conversion rates (profit).
Wish you good luck and lots of dollars made at your WordPress blog cash factory (don’t forget, money is not everything – Be good).
P.S. Comment if anything requires a better explanation.
Experienced tech professional with a strong track record in web services and fintech. Collaborating with Silicon Valley's multi-billion tech giants and offering a range of services committed to excellence. Check the Services page for how I can help you too.


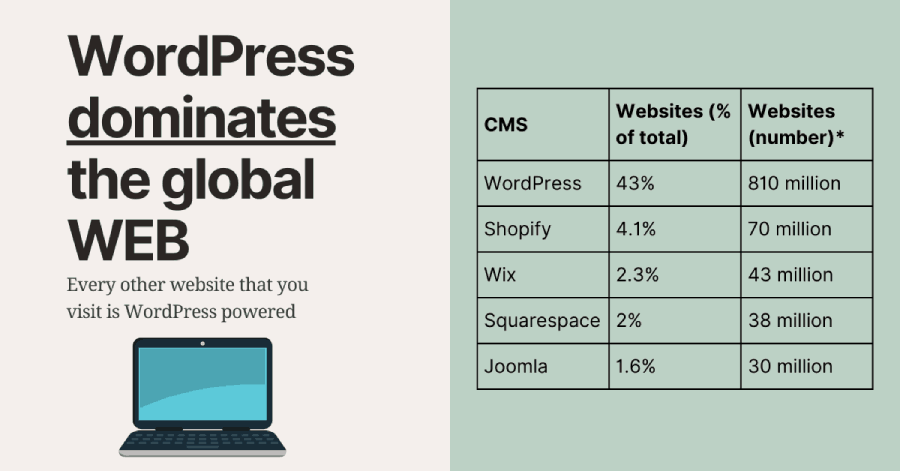
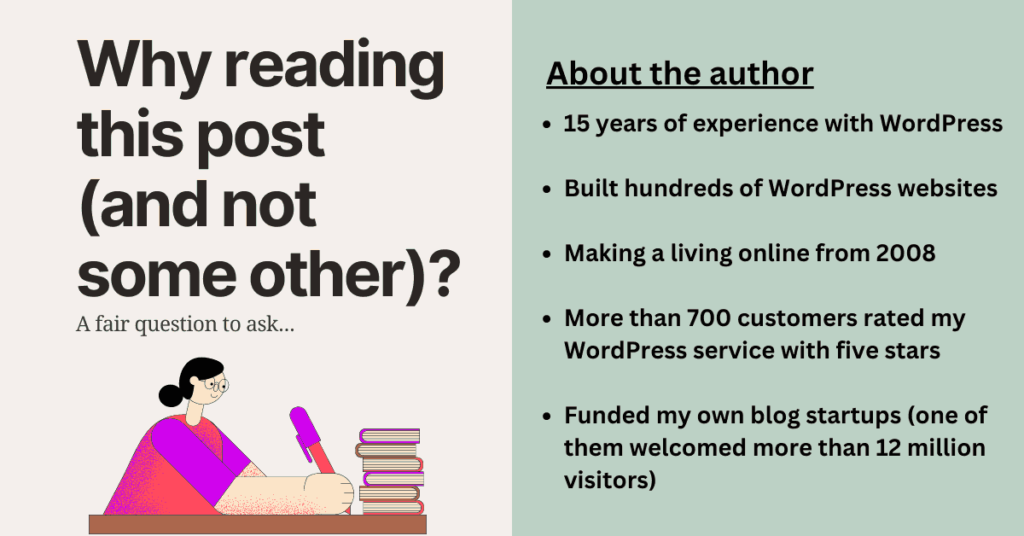
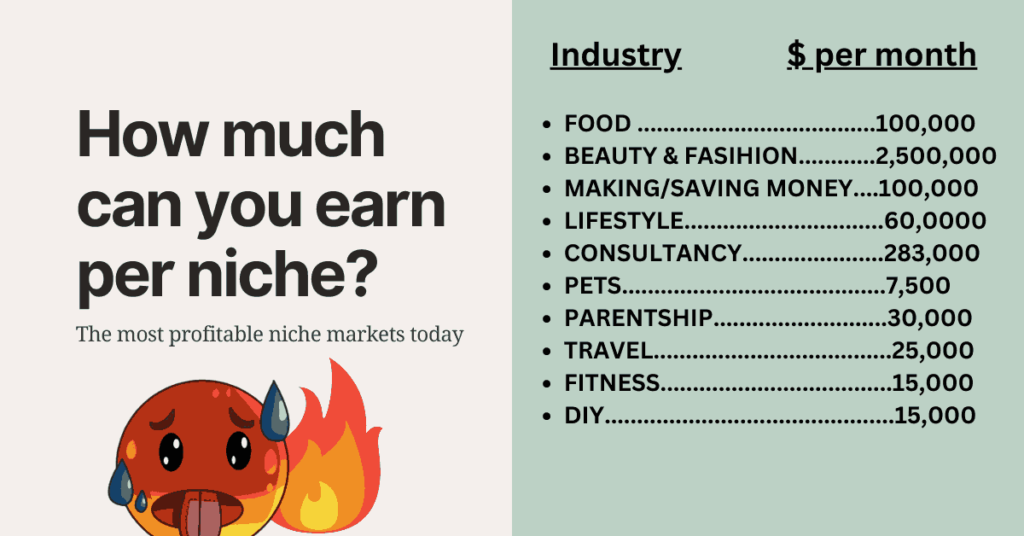
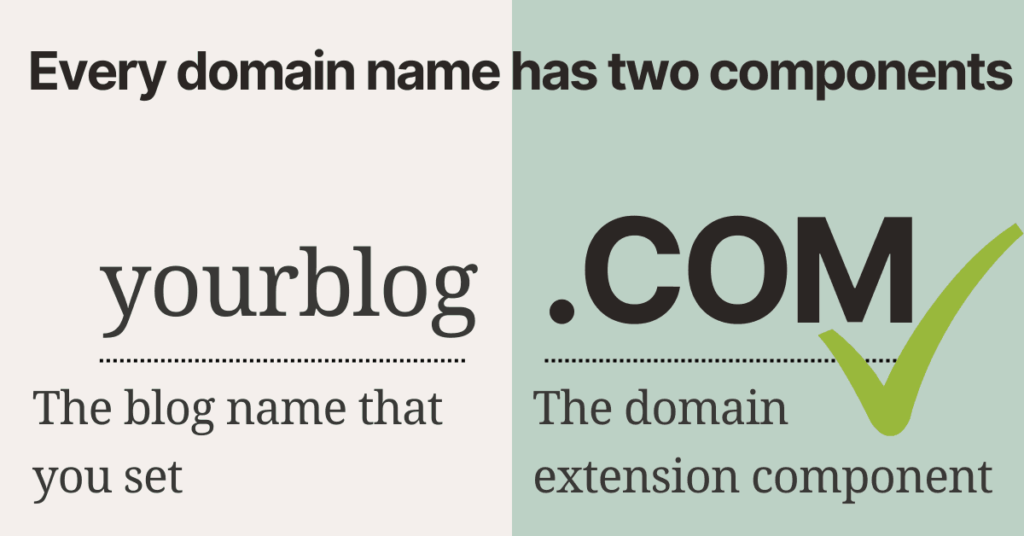
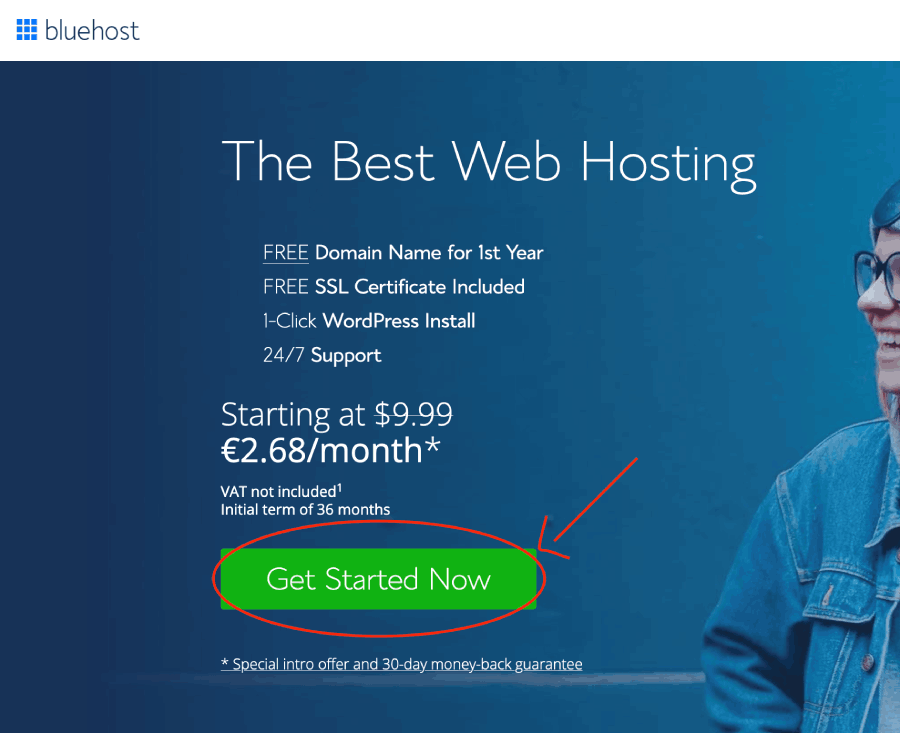
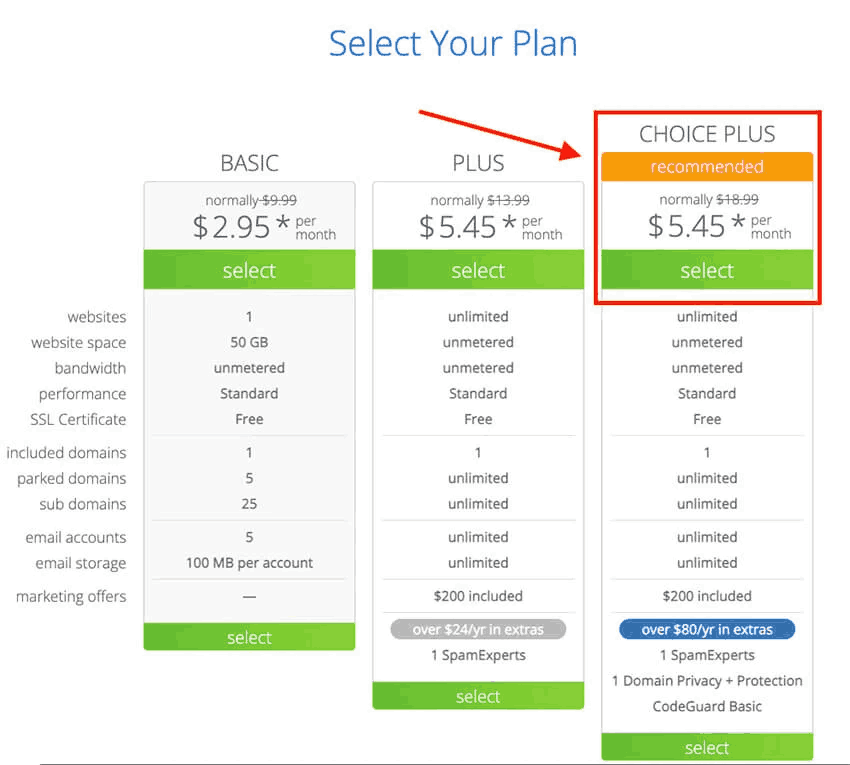
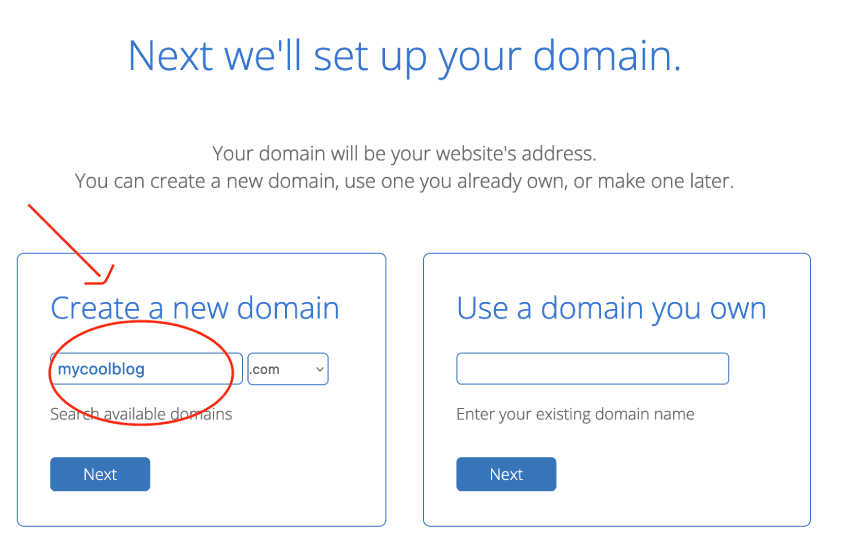

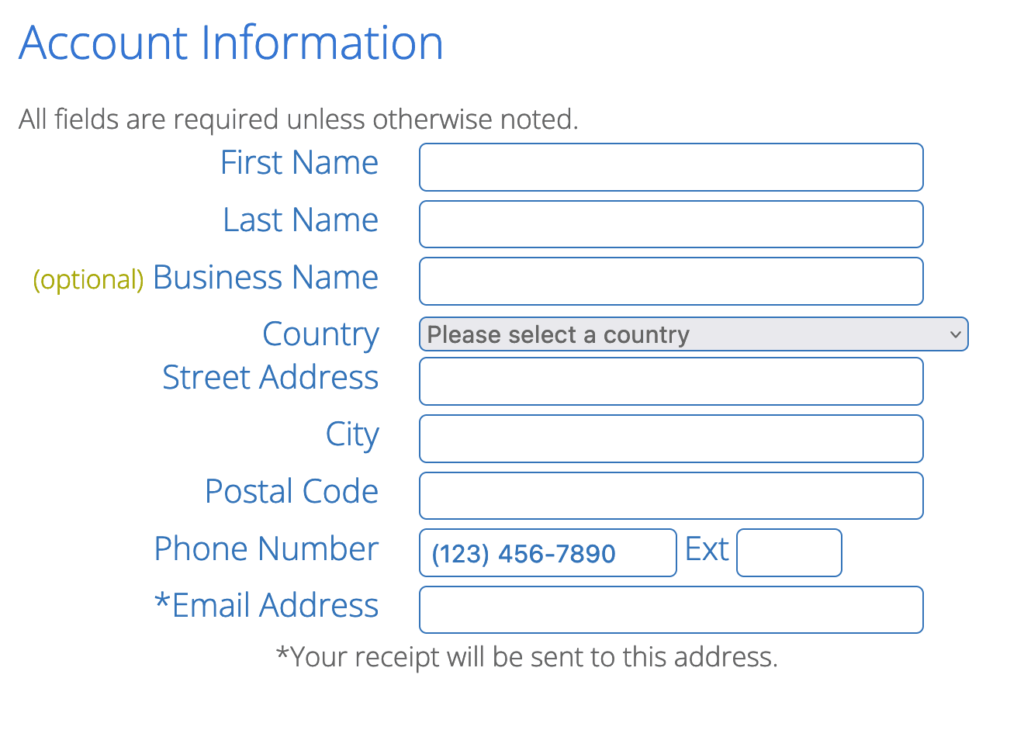
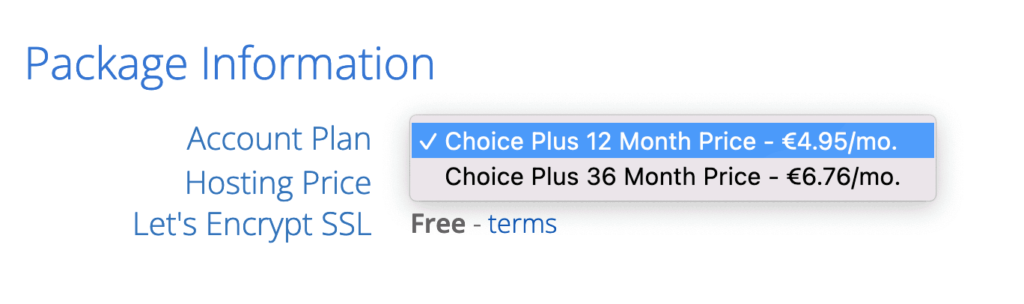
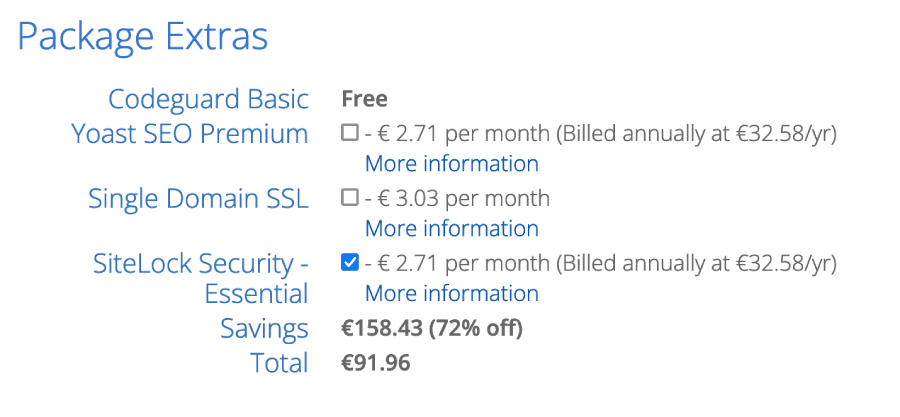
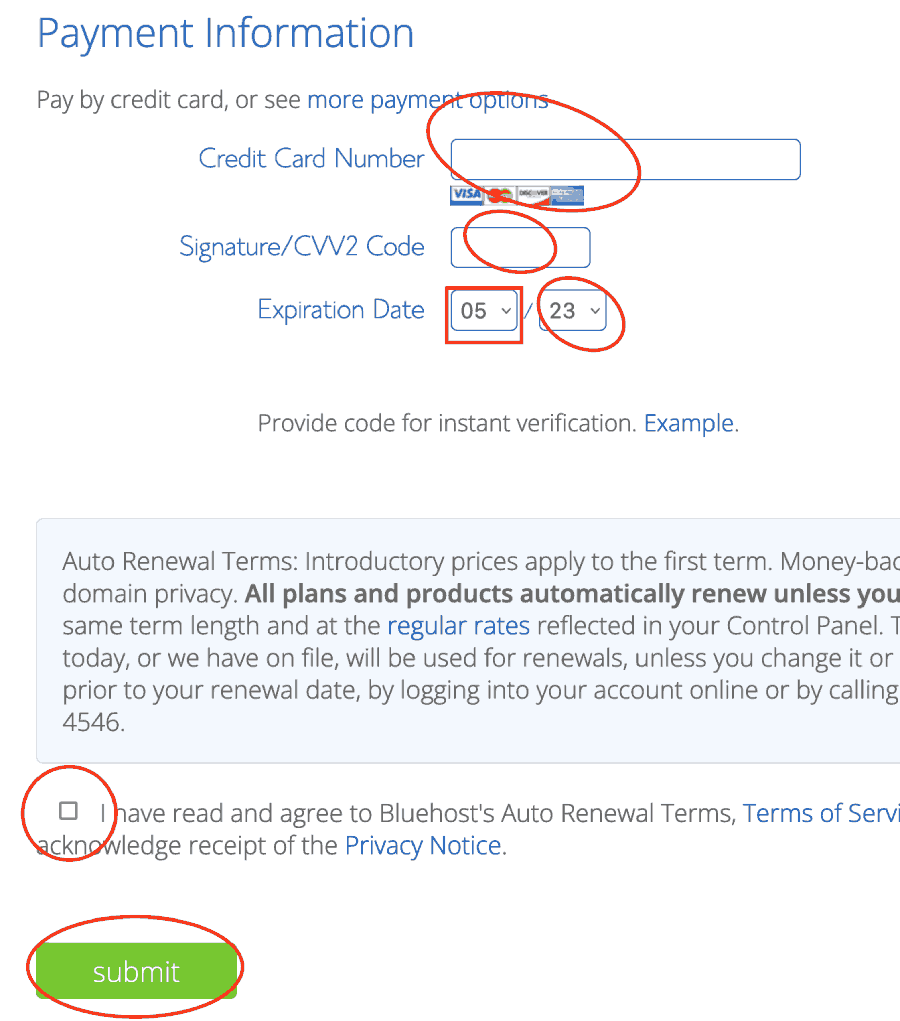
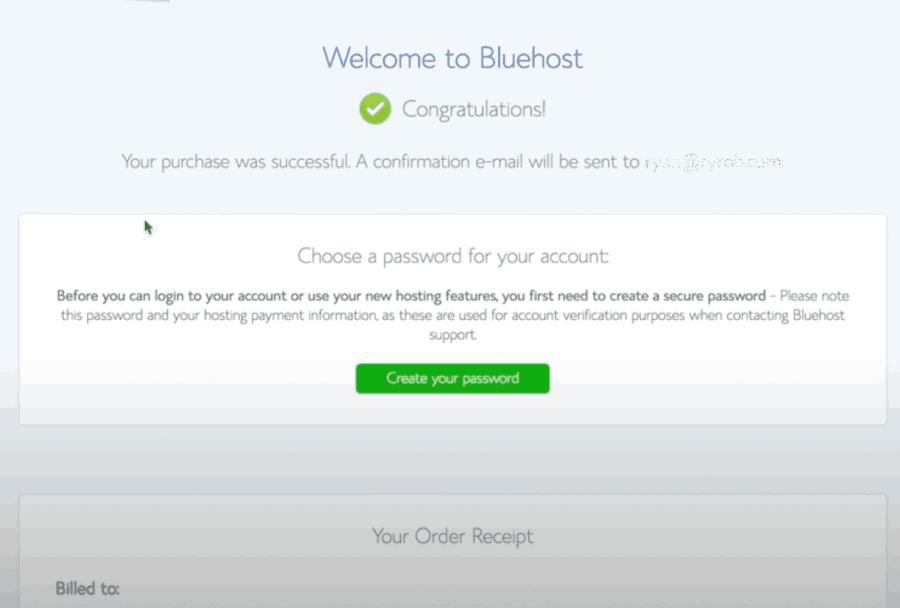
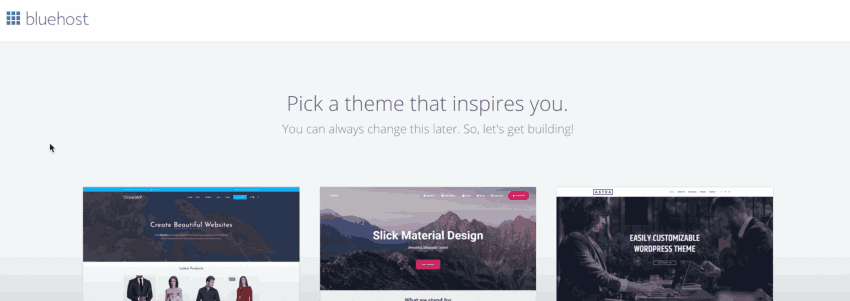

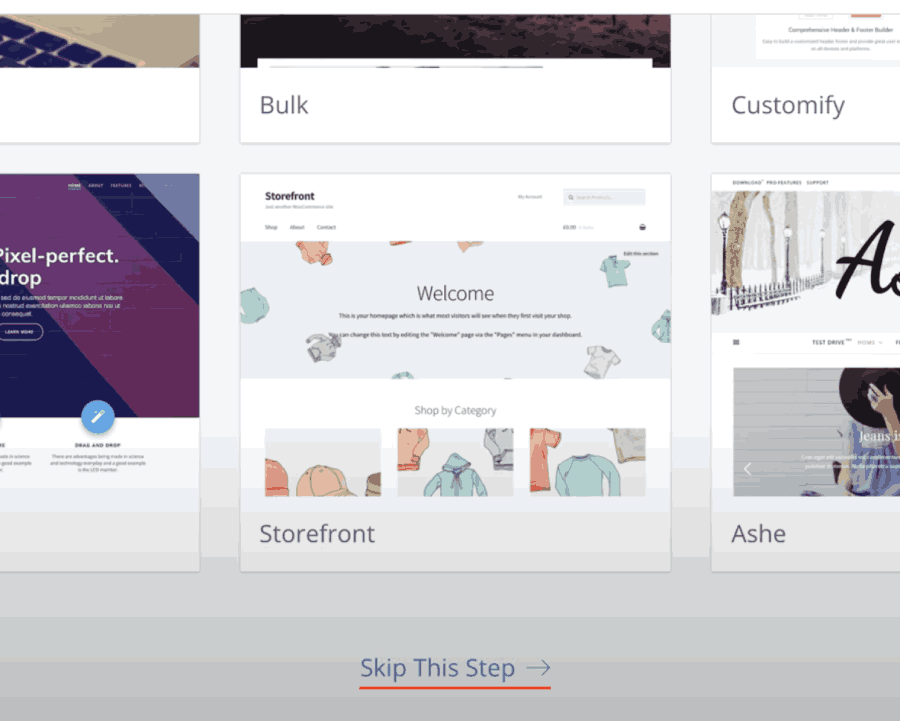
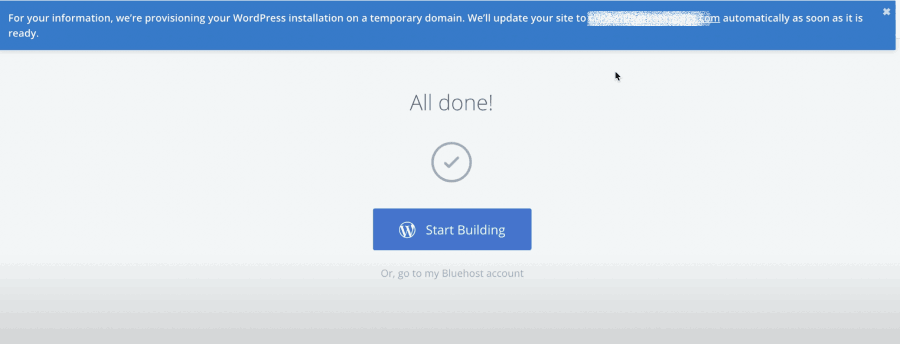
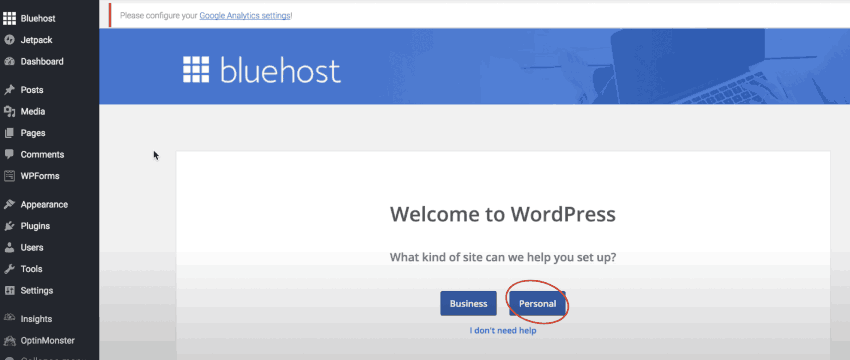
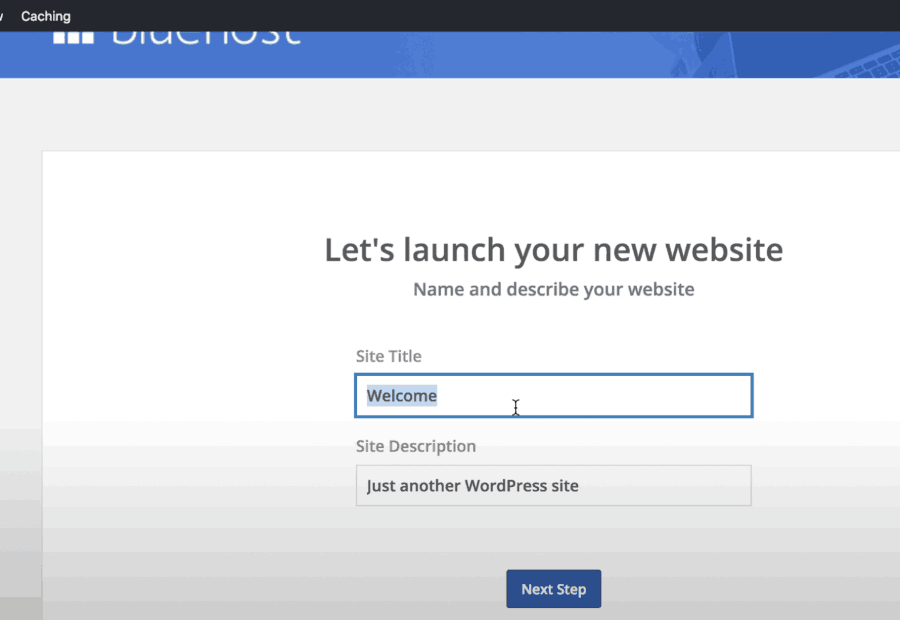
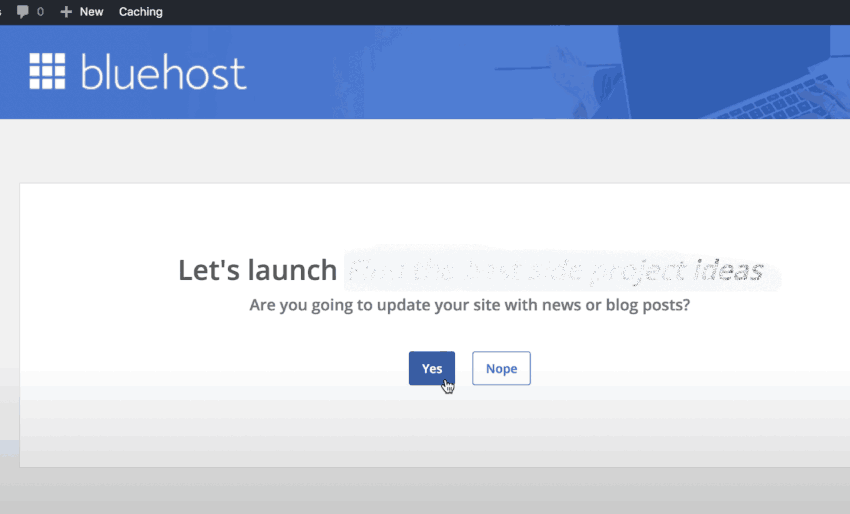
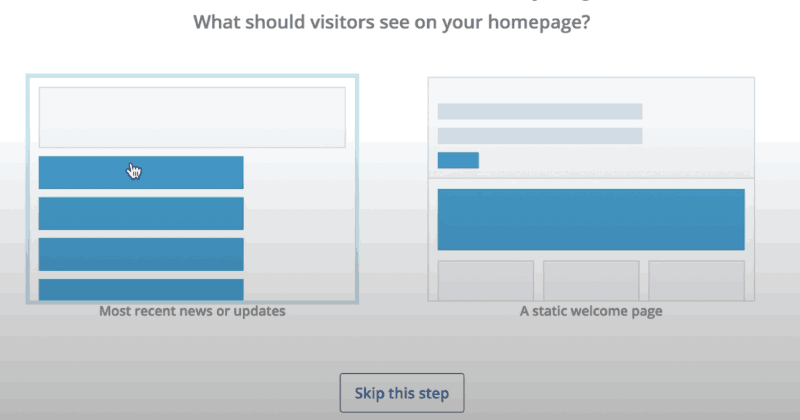
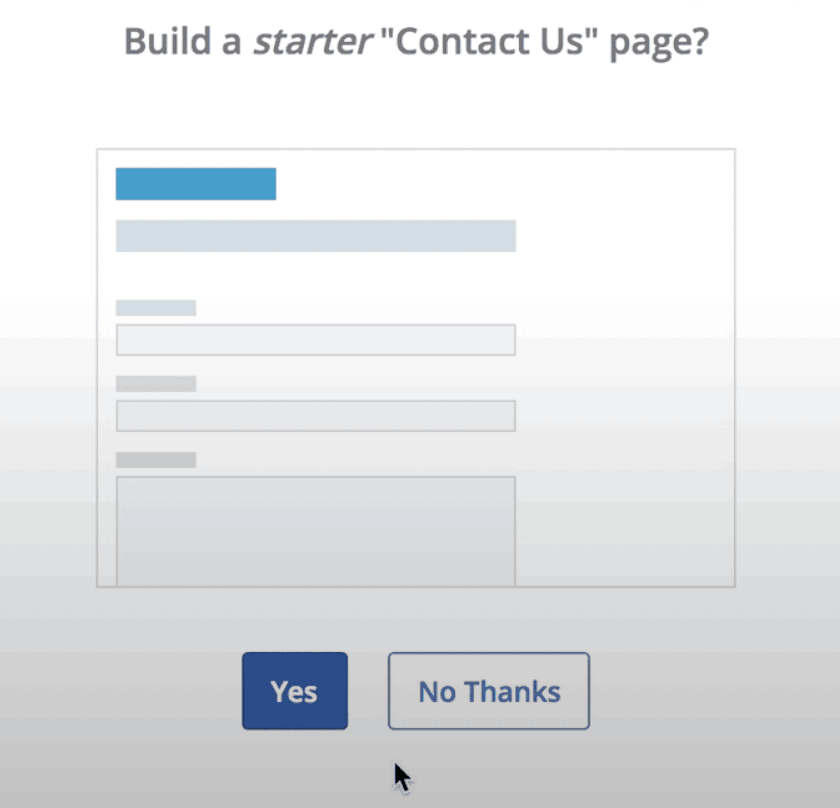
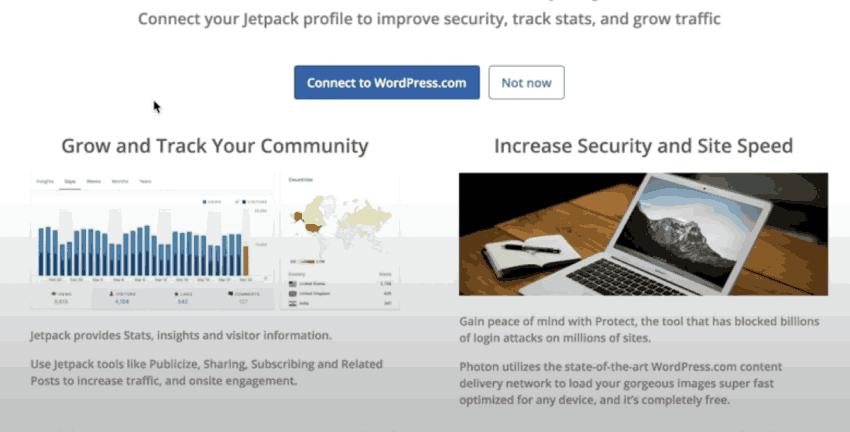
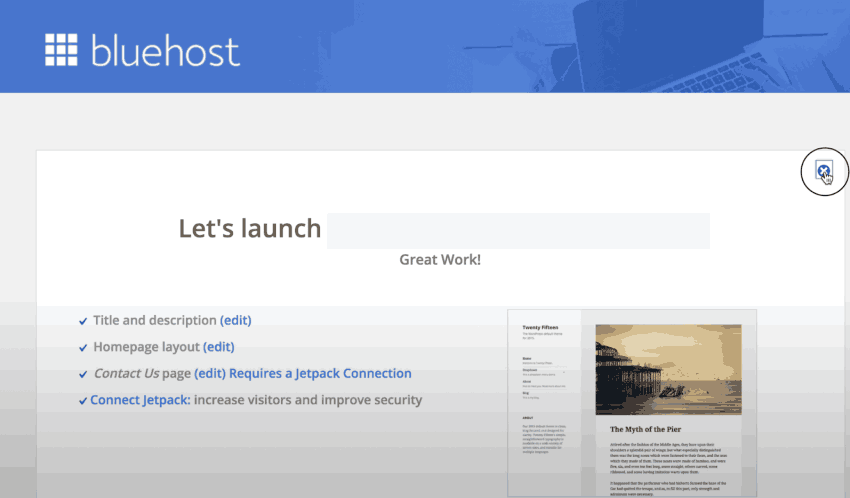
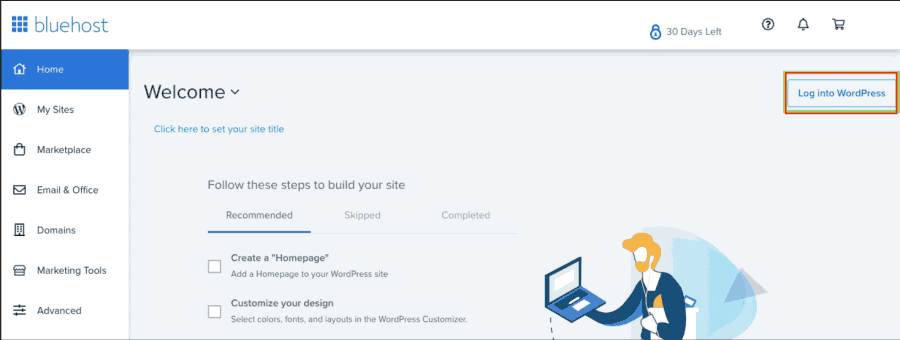
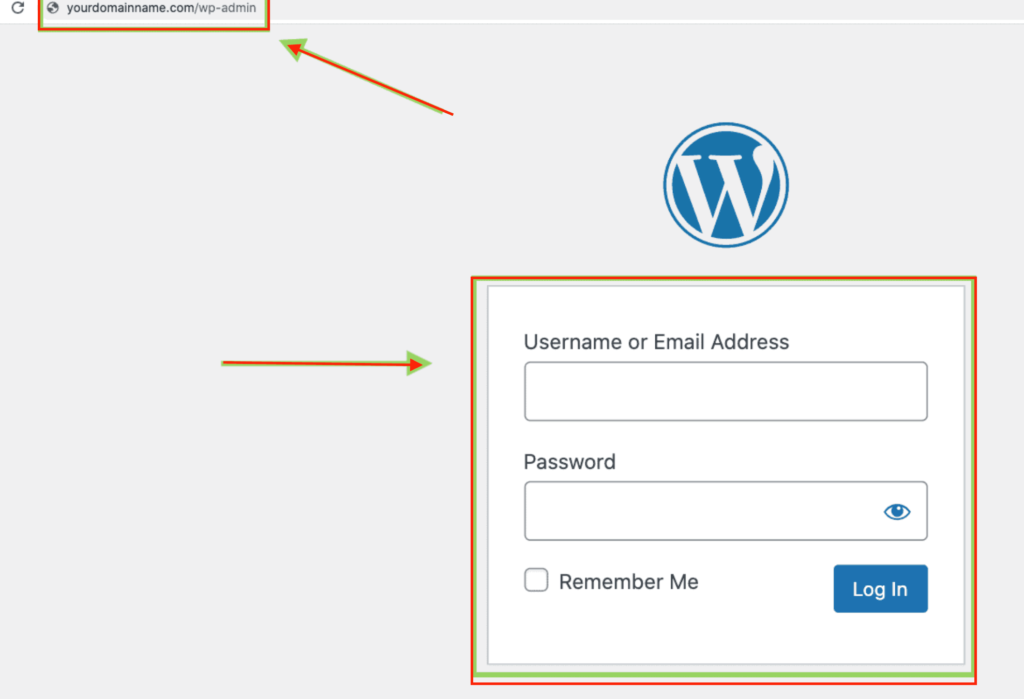

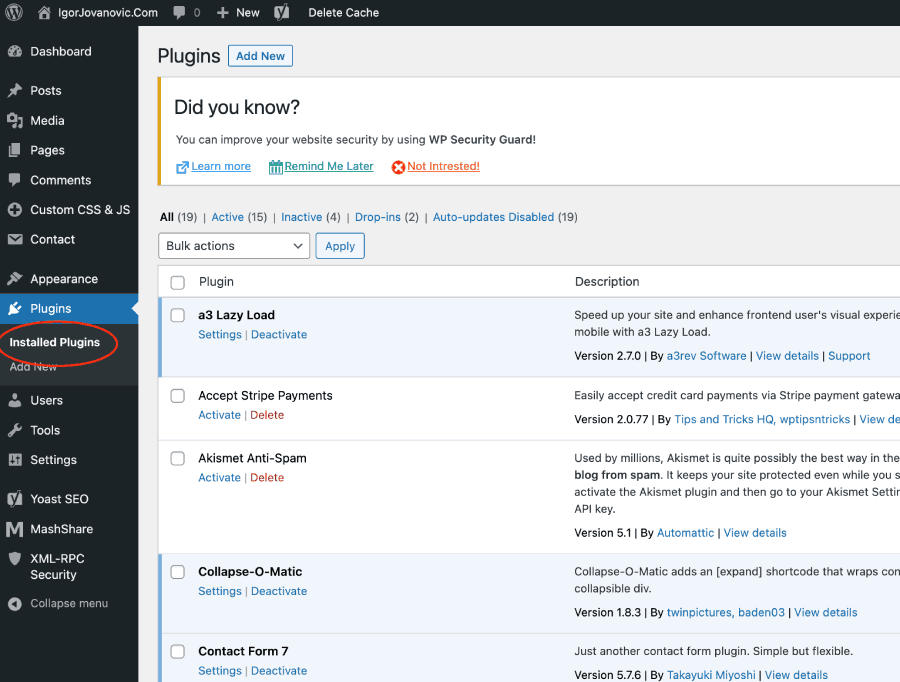


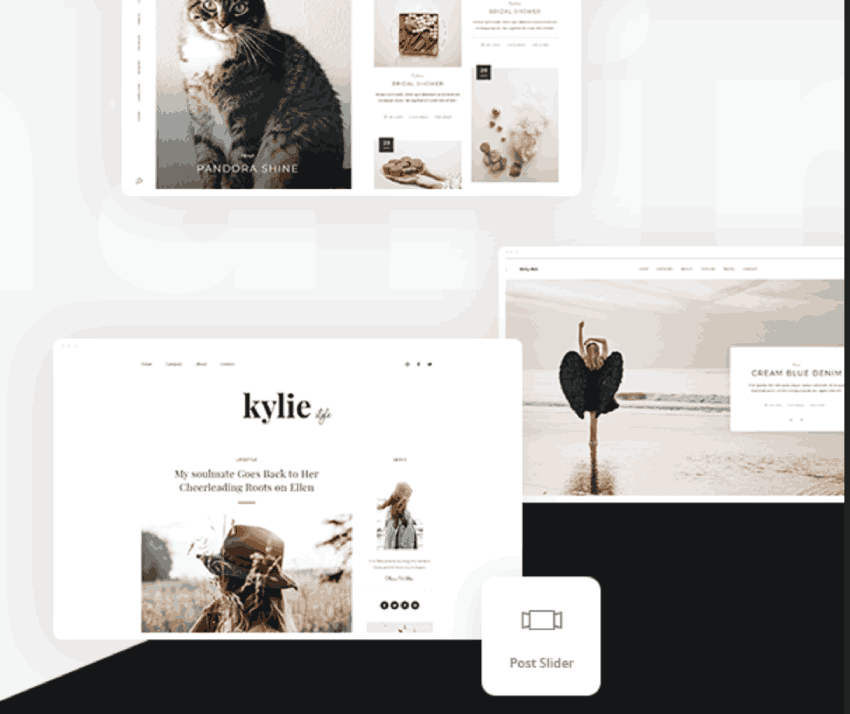
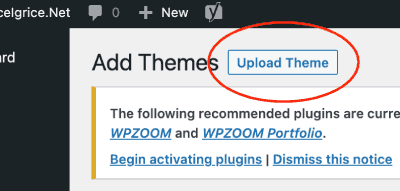
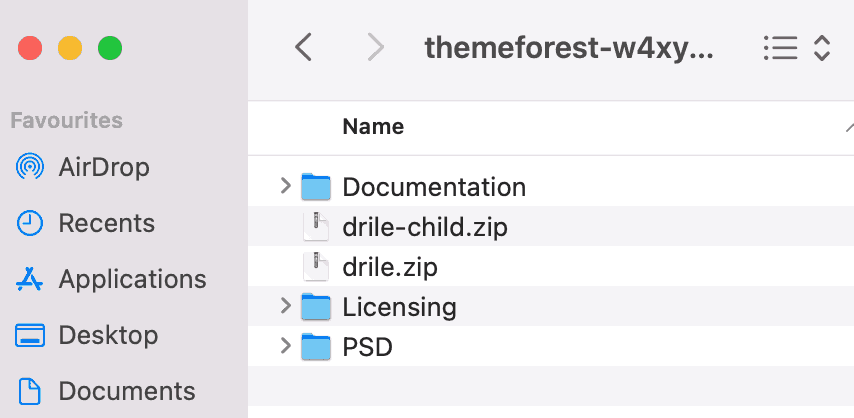

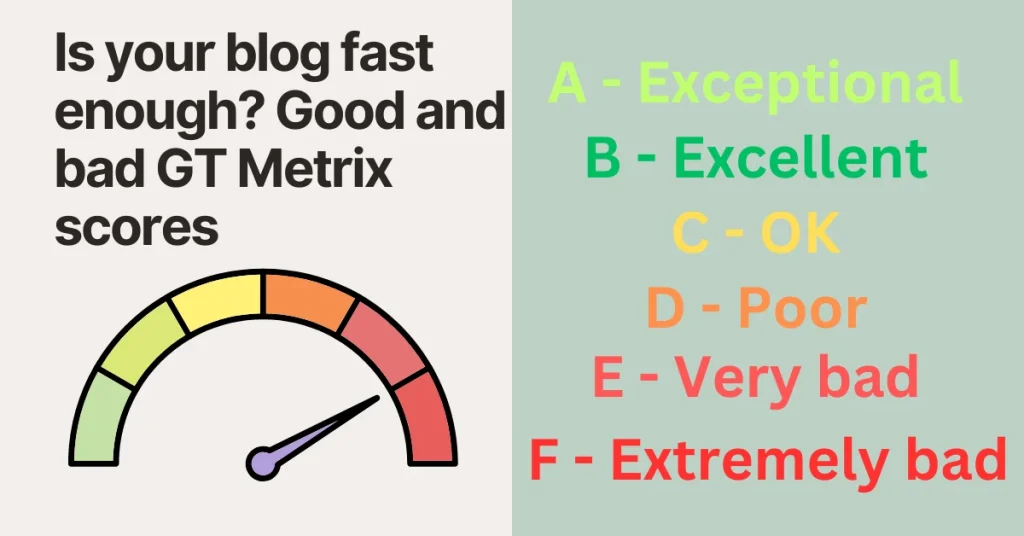


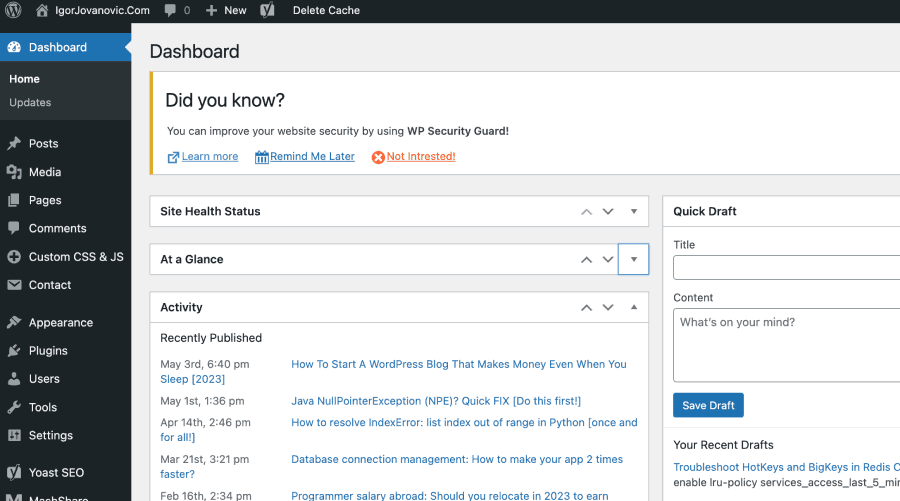
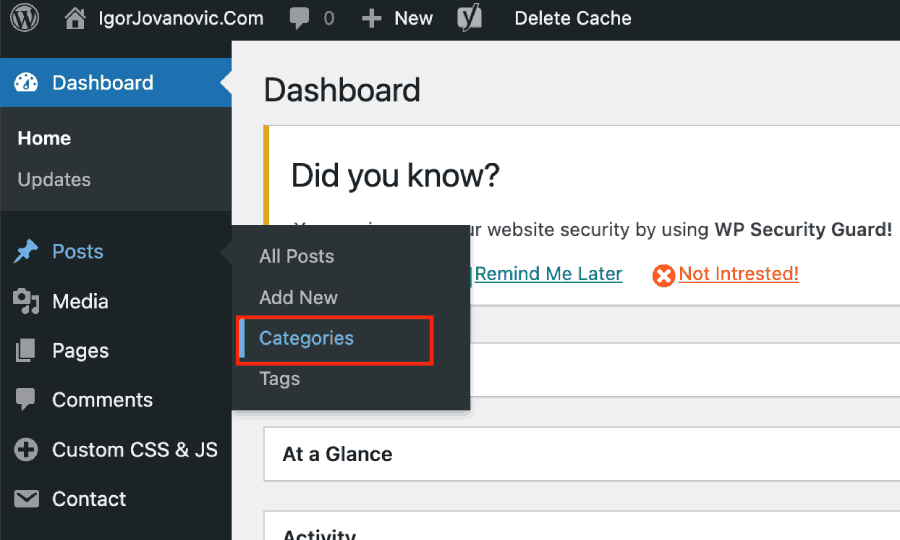
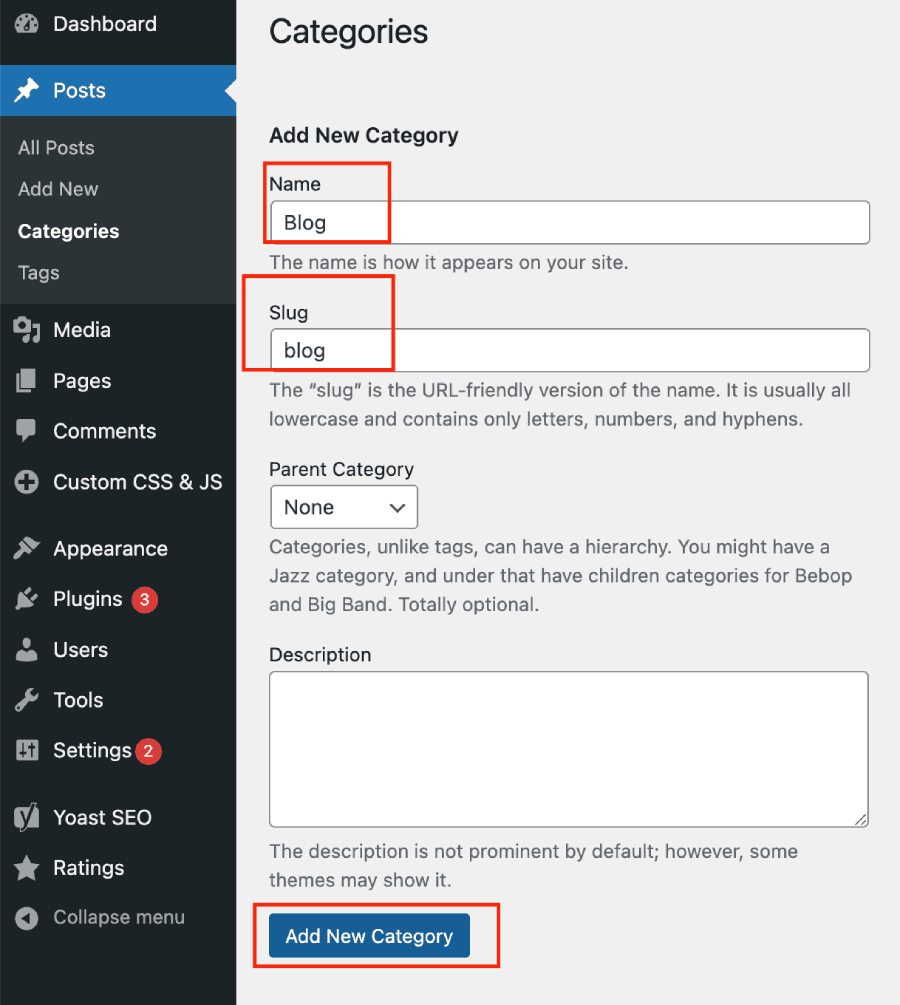
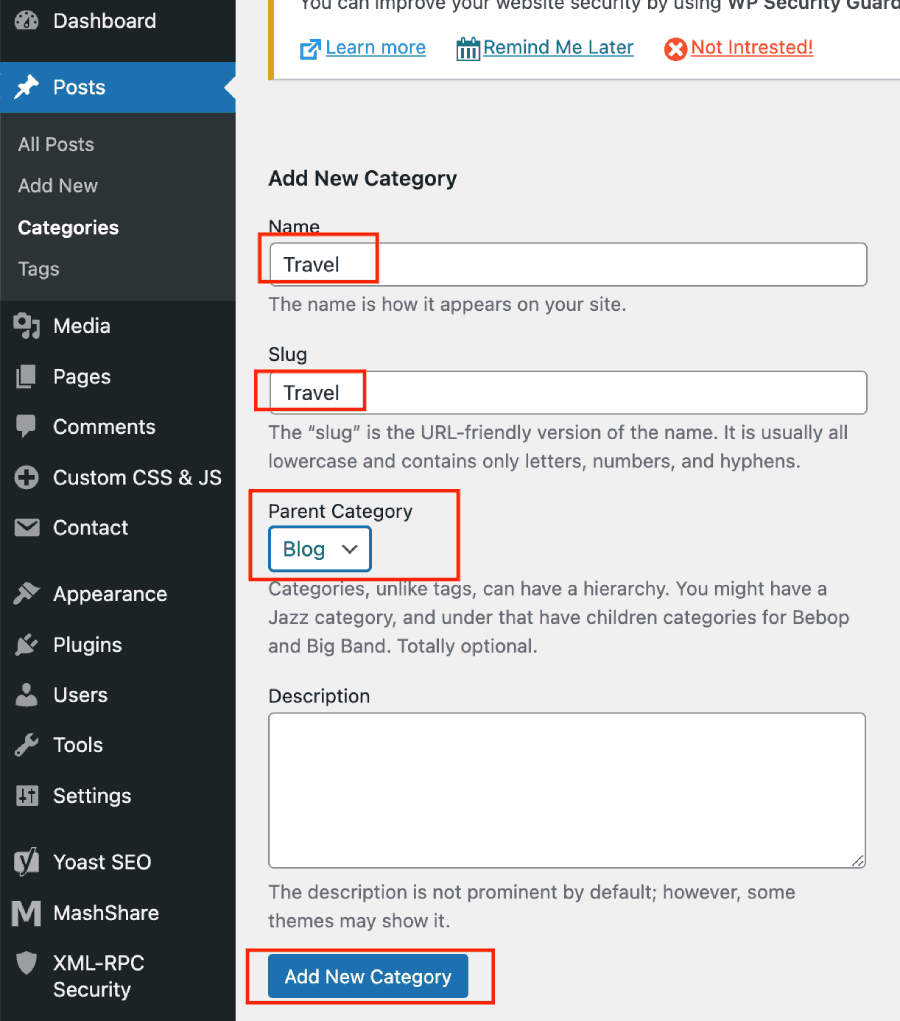
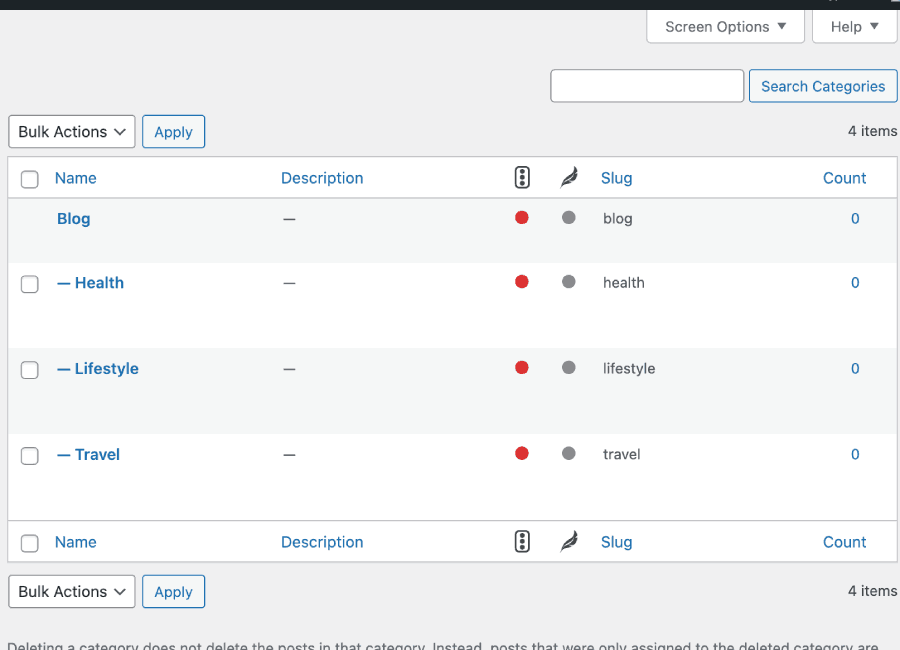

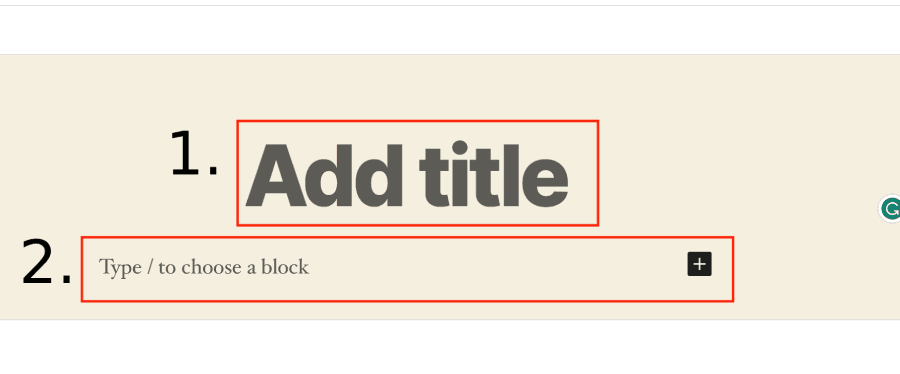
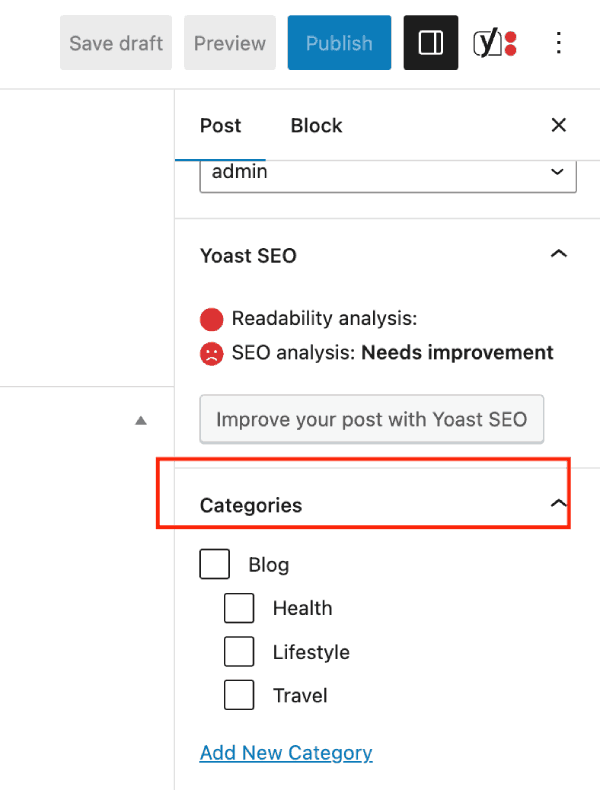


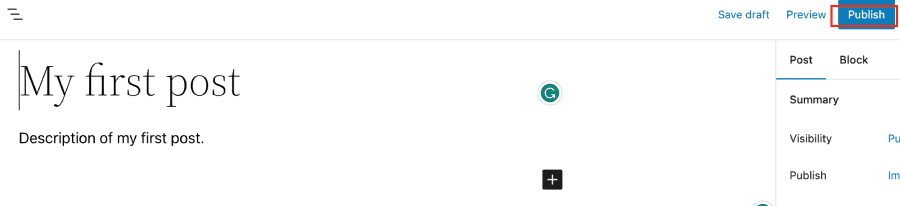
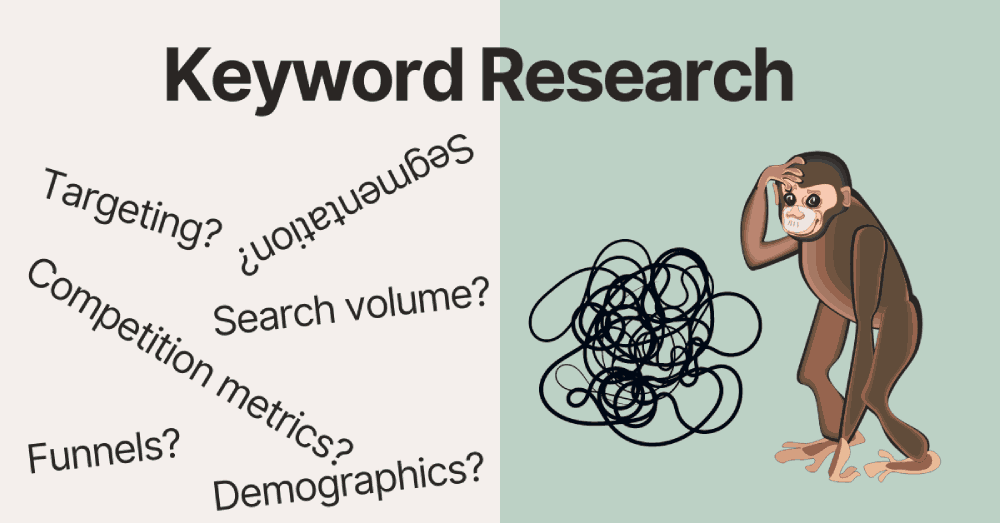
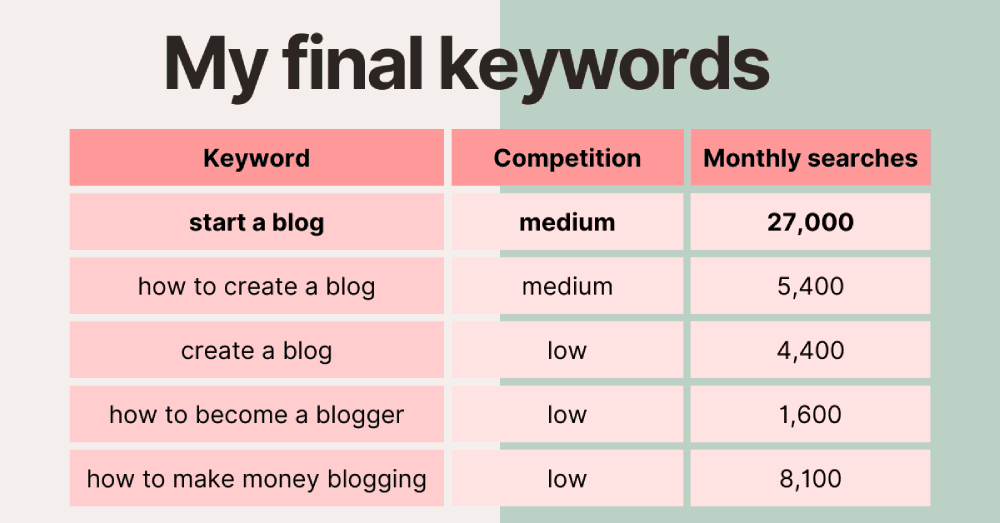
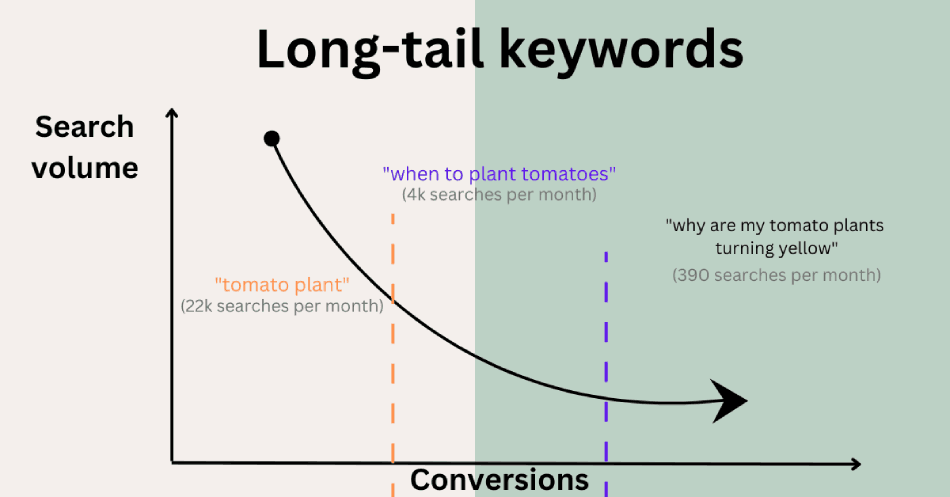
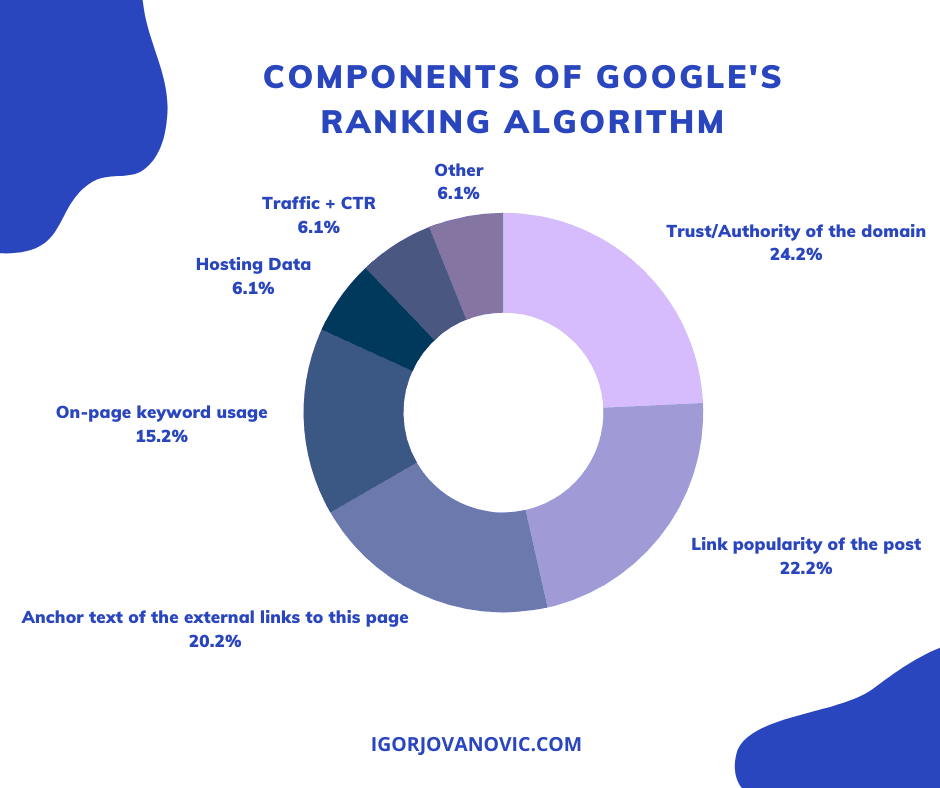
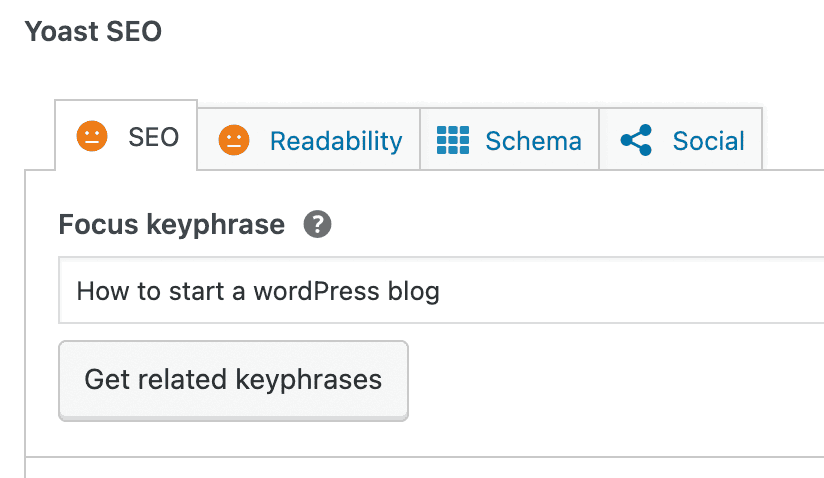
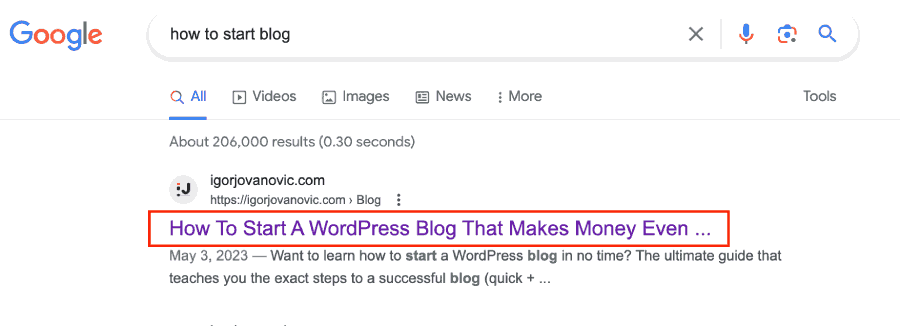
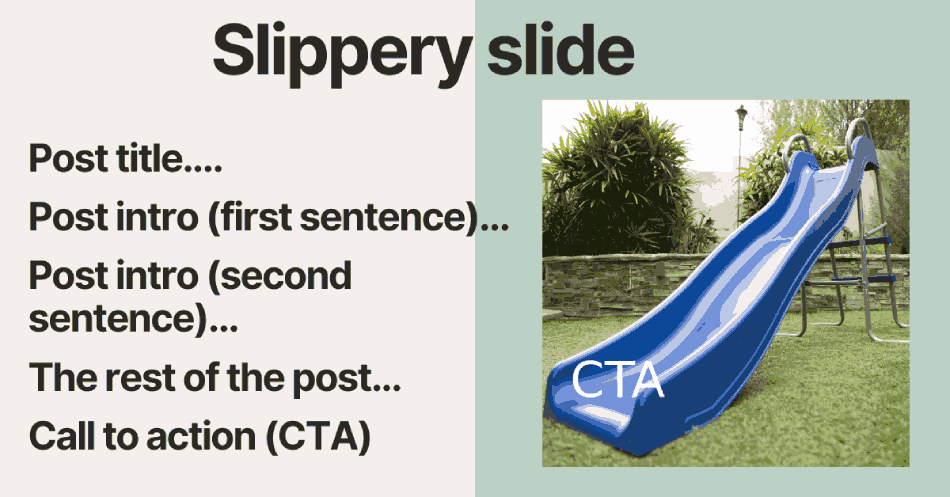


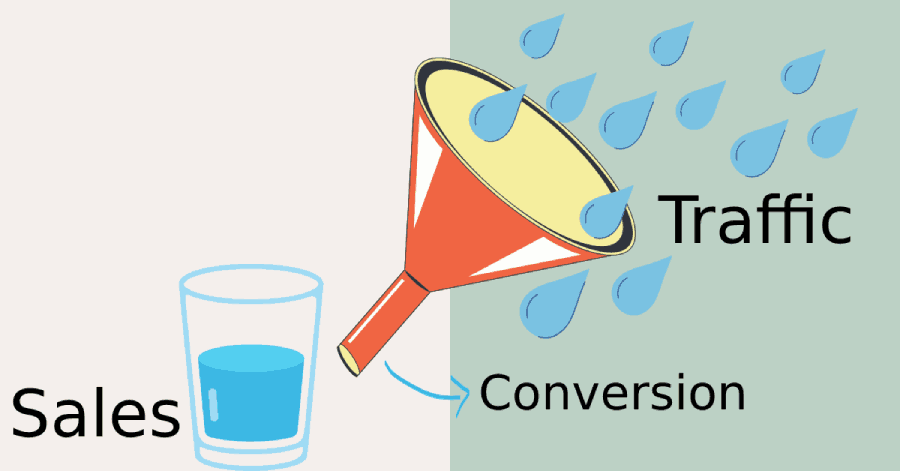
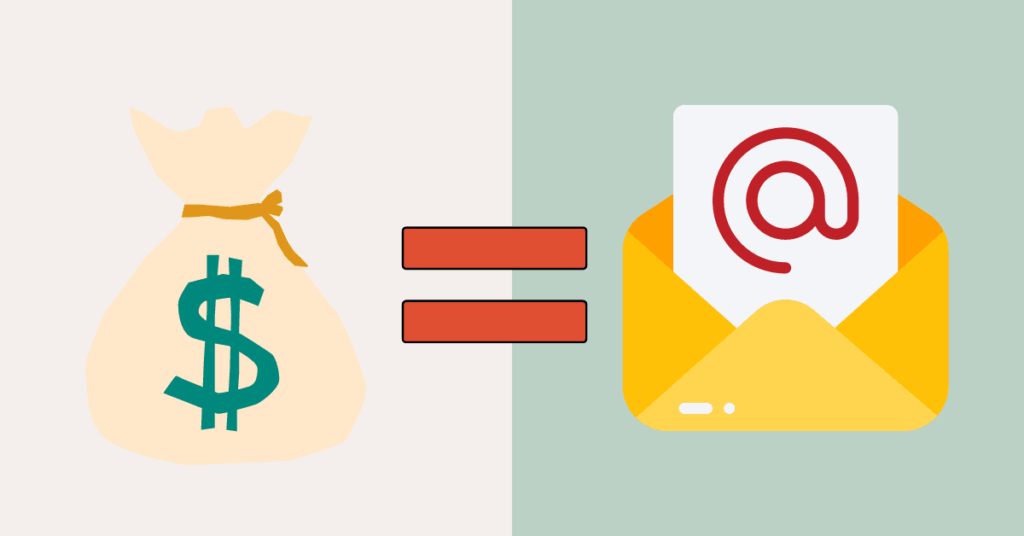
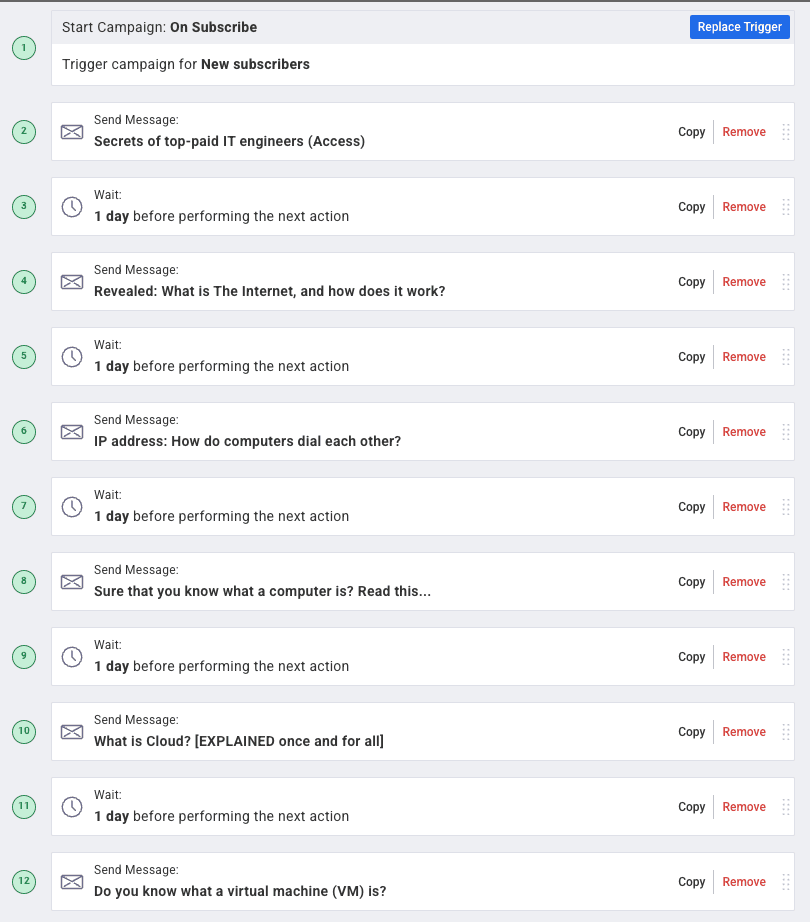

![Migrate ElastiCache to Redis Cloud (Enterprise) [Without Downtime]](data:image/svg+xml,%3Csvg%20xmlns='http://www.w3.org/2000/svg'%20viewBox='0%200%20150%20150'%3E%3C/svg%3E "Migrate ElastiCache to Redis Cloud (Enterprise) [Without Downtime]")


![Migrate ElastiCache to Redis Cloud (Enterprise) [Without Downtime]](https://igorjovanovic.com/wp-content/uploads/2023/07/Migrate-elasticache-to-redis-cloud-enterprise-1-1024x536.png "Migrate ElastiCache to Redis Cloud (Enterprise) [Without Downtime]")

![How To Choose The Best Programming Language To Learn For Beginners [Programmer’s Guide]](https://igorjovanovic.com/wp-content/uploads/2022/10/front_office_department-300x197.png "How To Choose The Best Programming Language To Learn For Beginners [Programmer’s Guide]")
")

