Categories
Blog Tech

Migrate ElastiCache to Redis Cloud (Enterprise) [Without Downtime]9 min read

Migrate Elasticache to Redis Cloud Enterprise (without downtime)

I have done this many times. Now it’s your turn. This article is a step-by-step guide showing you exactly how to migrate an ElastiCache Redis instance to Redis Cloud Enterprise (without downtime).

Often I see developers & tech leads struggling with the migration out of ElastiCache.

(And it’s not easy because there is a lot at stake — e.g., uptime.)

But is there actually a way to migrate without any downtime?

Well, this is a lift-and-shift kind of migration…

And you might think it always brings some downtime…

(Because you “lift” your data out of one place and “carry” it to another place.)

But luckily enough, there is a solution…

Let me show you the steps to “live” migration from ElastiCache to Redis Cloud (or on-prem Redis Enterprise or even Redis open-source).

(We are going to sort of fix an airplane in mid-air.)

Prerequisites for the successful migration

Good preparation is a half-done task.

Let’s look at what you need to have in place to begin.

  • Redis Cloud (or Enterprise) database endpoint — this will be your target DB (Note: you can sign up for the FREE Redis Cloud tier here).
  • Redis Cloud database connection credentials (i.e., DB username and password).
  • ElastiCache database endpoint that you want to migrate from — this will be your source DB (read here how to find the endpoint in your AWS).
  • RIOT migration tool (more on it below).

Now, you are most probably familiar with Redis and ElastiCache.

However, RIOT can be new to you (and yes, it has a strange name).

This is a Java-based tool that makes the migration possible.

Here are the steps to have the RIOT software up and running (it’s an open-source code).

  1. Create an EC2 instance (optional: with Docker installed) and make sure this instance has access to the VPC where your ElastiCache instance runs.
  2. Ensure that the EC2 instance also has access to the Redis Cloud (Enterprise) database endpoint (e.g., can ping it).
  3. You can either install RIOT through Docker (it’s much easier), or you can install it manually by following the official guide from here (in which case you also need Java 11+)

Note: The official RIOT documentation covers all the tool options pretty well.

That’s really it regarding the requirements…

Now that we have that out of the way, you are almost ready to start the migration…

But before that…

Let’s push some more buttons (to prepare right)

First things first — backup your data.

(As the old rule goes, if you have a backup, you won’t need it at all, and if you don’t, well, you can guess…).

Here is how you perform the backup on your ElastiCache instance.

Before moving on, I suggest you also do a small cleanup of the keys you don’t need (so that your migration is as efficient as possible).

Ask yourself if your source DB actually needs all those keys.

(You want to make the migration as lightweight as possible.)

To prepare for D-day, it’s wise to inventory the total key count your ElastiCache database contains.

And this is relatively easy to do.

You can simply execute the below command into your redis-cli.

redis-cli INFO KEYSPACE

Example output:
10.3.0.0:15072> INFO KEYSPACE
# Keyspace
db0:keys=9345,expires=0,avg_ttl=0Code language: PHP (php)

If you prefer a UI, Redis released a desktop tool called Redis Insight that you can install for free on your system and interact with your Redis database (even if it’s in ElastiCache).

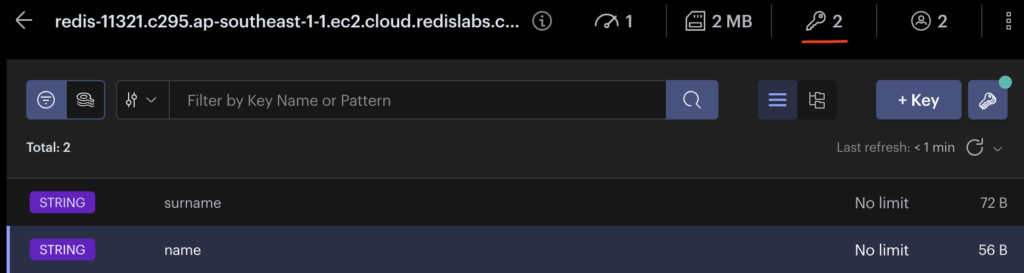
So, this tool can show you the number of keys as well (look below, my db has 2 keys in it)…

Migrate Elasticache to Redis Cloud Enterprise (without downtime)
The key number is in the upper right (RedisInsight)

Moving on to the last piece before we fire it up…

Redis has a feature that we call “keyspace notifications.” These notifications allow external tools (such as RIOT) to listen to real-time changes made to the keys.

Here you can read more about keyspace notifications (it’s a sort of a PUB/SUB mechanism.)

Anyways.

You must enable this to your ElastiCache instance so that RIOT can track the keys properly.

Since AWS disables keyspace notifications by default, you can follow this article to enable it.

Believe it or not, that’s all… You are finally ready to kick off the migration.


Migrate ElastiCache to Redis Cloud Enterprise

To migrate Elasticache to Redis Cloud Enterprise, you will need to execute this command on the instance hosting RIOT.

riot <source> replicate <target> --mode <snapshot|live|compare> [OPTIONS]Code language: HTML, XML (xml)

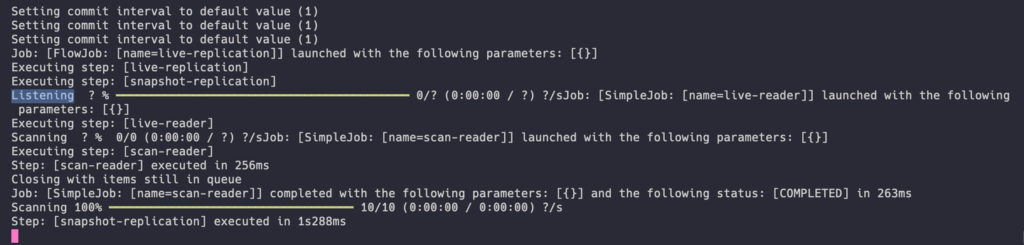
Of course, you must change the source, and target, and select the replication mode.

In short, the snapshot migration would only move the existing dataset while the live option keeps listening to the key changes and moves the existing dataset + the incoming changes (runs continuously).

Refer to the RIOT documentation for more options.

What if the target database is an Active-Active database?

It’s not a big deal.

RIOT still works here.

The only thing you have to change are the parameters of the command.

Take a look at the command below.

riot -h <source> -p <source-port> replicate --type ds -h <target> -p <target-port> --mode liveCode language: HTML, XML (xml)

*Replace everything between <> with your values.

Simply ensure that the replication mechanism is set to ds , and rest assured this will work even for a complex target (such as an A-A database).

How about migration from ElastiCache Redis 7.x to Redis 6.x (version mismatch)?

Again, very simple.

You cannot use the default replication mechanism.

Similar to the active-active database, you must specify the ds parameter so that the migration works.

riot -h <source> -p <source-port> replicate --type ds -h <target> -p <target-port> --mode liveCode language: HTML, XML (xml)

Sit, relax, and watch it in action.

Update: How to migrate your database to Redis 7.2?

Redis 7.2 is now publicly available in Redis Cloud. Do you have an older version of Redis running on Elasticache (v6.x or even v7.0)?

That’s not an issue…

Just make sure that you run riot with the -ds flag, and the migration will work just fine.

Here is the full command you need to run to migrate from Elasticache 6 or 7 to Redis 7.2 (the latest).

riot -h <source> -p <source-port> replicate --type ds -h <target> -p <target-port> --mode liveCode language: HTML, XML (xml)

Is your source database clustered, or is the target DB running OSS Cluster API?

RIOT has additional parameters for almost any use case you can think of.

So, there are different migration commands depending on the source/target clustering settings (read here more).

Here is the command you want RIOT to execute if your ElastiCache database is clustered (multi-master) or if your target database is running in the OSS-API mode.

riot -h <source EC host> -p <source EC port> --cluster replicate -h <target RE host> -p <target RE port> --pass <RE password>Code language: HTML, XML (xml)

*Replace all under <> with your values.

Notice the --cluster flag which makes the migration possible.

If the command executes well, you will see something similar to the screen below, meaning the replication has started successfully.

Migrate Elasticache to Redis Cloud Enterprise
RIOT in action in the live replication mode

Before your target goes “live”

It’s not rocket science, but there are still a few gotchas that can complicate your life…

And who needs that?

I always prefer the “better safe than sorry” approach (and you should too).

Here are the additional questions to ask yourself before directing the traffic to the new database.

  • Test, test, test… Migrate your staging DB first and test your app’s behavior before you promote the changes to the prod env.
  • If you are coming from a single-master setup (where all the keys are on a single shard), get familiar with clustering in Redis Cloud Enterprise.
  • Check your app against these commands to avoid the CROSSLOT error (here are some best practices).
  • If any of the above commands is giving you errors, you might need to save the keys onto the same key slot (by using the {} syntax, check here for more).
  • You will have to potentially remove some code from your app since some commands (such as CLUSTER SLOT) are not needed/available in Redis Cloud (you will always connect against a single endpoint, and you don’t care where the keys are).
  • Again, test, test, and test in staging before going to prod.
  • If, for whatever reason, RIOT is not an option for you (or if you can afford downtime), consider the “offline” migration methods from here.

The cut-off point (D-day)

When you are 100% sure you checked all the above boxes, you can go to the last step…

It’s basically the cut-off point.

That’s the moment when you change the database endpoint in your application.

(Direct the traffic to the new database.)

Most of the use cases I worked with do this change during the off-peak hours and ideally combine it with the regular deployment cycle.

(It’s nothing more than a configuration change of the database URL and credentials.)

To be safe, disconnect all the clients from the app (kill the connections) so that all the traffic reconnects to the new database.

The cut-off point brings a short disconnect to the clients that can be barely noticed.

All in all, it’s a no-downtime approach if you do everything as I told you in this article…

Final thoughts

I’ve helped probably more than 100 Redis migrations…

This post shares what I learned over the years of doing this…

(But also point you in the error-free direction and how to avoid mistakes that can cost you dearly…)

We discussed the live migration technique that brings “no downtime” (via RIOT).

I also told you the prerequisites to safe migration and how to prepare properly.

In the end, I mentioned the command that you need to use and how to increase your chances that the migration will go smoothly.

With all that, your app should now be good to go, and your users happily connected to the more performant DB.

(And if not, you can ask the questions in the comments, and I will help.)

P.S.

If you want to continue learning, check out my other post about one of the most common Redis problems (and how to resolve it).

Full disclaimer: I work at Redis (the company), and this article reflects my personal view on the problem (based on my experience).


Avatar photo

By Igor Jovanovic

Founder & Full Stack Tech Consultant

Experienced tech professional with a strong track record in web services and fintech. Collaborating with Silicon Valley's multi-billion tech giants and offering a range of services committed to excellence. Check the Services page for how I can help you too.

Leave a Reply

Your email address will not be published. Required fields are marked *